SpringCloudAlibaba入门系列(2) - 微服务环境搭建 | 字数总计: 2.5k | 阅读时长: 13分钟 | 阅读量: |
摘要: 通过使用电商项目中的商品、订单、用户为案例进行实例演示。
2.1 案例准备 2.1.1 技术选型 maven:3.3.9
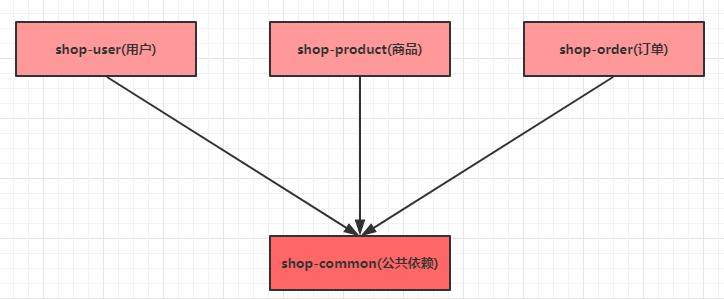
2.1.2 模块设计 springcloud-alibaba 父工程
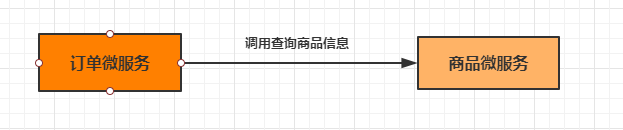
2.1.3 微服务调用 在微服务架构中,最常见的场景就是微服务之间的相互调用。我们以电商系统中常见的用户下单为例来演示微服务的调用:客户向订单微服务发起一个下单的请求,在进行保存订单之前需要调用商品微服务查询商品的信息。
我们一般把服务的主动调用方称为服务消费者 ,把服务的被调用方称为服务提供者 。
在这种场景下,订单微服务就是一个服务消费者, 商品微服务就是一个服务提供者。
2.2 创建父工程 创建一个maven工程,然后在pom.xml文件中添加下面内容
1
2
3
4
5
6
7
8
9
10
11
12
13
14
15
16
17
18
19
20
21
22
23
24
25
26
27
28
29
30
31
32
33
34
35
36
37
38
39
40
41
42
43
<?xml version="1.0" encoding="UTF-8"?> <project xmlns ="http://maven.apache.org/POM/4.0.0" xmlns:xsi ="http://www.w3.org/2001/XMLSchema-instance" xsi:schemaLocation ="http://maven.apache.org/POM/4.0.0 http://maven.apache.org/xsd/maven-4.0.0.xsd" > <modelVersion > 4.0.0</modelVersion > <parent > <groupId > org.springframework.boot</groupId > <artifactId > spring-boot-starter-parent</artifactId > <version > 2.1.3.RELEASE</version > </parent > <groupId > com.taiji</groupId > <artifactId > springcloud-alibaba</artifactId > <packaging > pom</packaging > <version > 1.0-SNAPSHOT</version > <properties > <java.version > 1.8</java.version > <project.build.sourceEncoding > UTF-8</project.build.sourceEncoding > <project.reporting.outputEncoding > UTF-8</project.reporting.outputEncoding > <spring-cloud.version > Greenwich.RELEASE</spring-cloud.version > <spring-cloud-alibaba.version > 2.1.0.RELEASE</spring-cloud-alibaba.version > </properties > <dependencyManagement > <dependencies > <dependency > <groupId > org.springframework.cloud</groupId > <artifactId > spring-cloud-dependencies</artifactId > <version > ${spring-cloud.version}</version > <type > pom</type > <scope > import</scope > </dependency > <dependency > <groupId > com.alibaba.cloud</groupId > <artifactId > spring-cloud-alibaba-dependencies</artifactId > <version > ${spring-cloud-alibaba.version}</version > <type > pom</type > <scope > import</scope > </dependency > </dependencies > </dependencyManagement > </project >
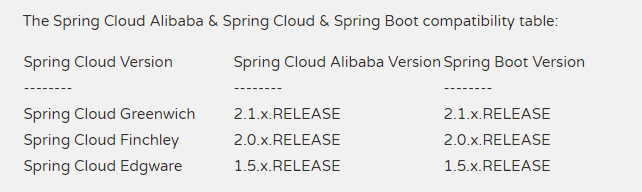
版本对应:
2.3 创建基础模块 1 创建shop-common 模块,在pom.xml中添加依赖
1
2
3
4
5
6
7
8
9
10
11
12
13
14
15
16
17
18
19
20
21
22
23
24
25
26
27
28
29
30
31
32
33
34
35
<?xml version="1.0" encoding="UTF-8"?> <project xmlns ="http://maven.apache.org/POM/4.0.0" xmlns:xsi ="http://www.w3.org/2001/XMLSchema-instance" xsi:schemaLocation ="http://maven.apache.org/POM/4.0.0 http://maven.apache.org/xsd/maven-4.0.0.xsd" > <parent > <artifactId > springcloud-alibaba</artifactId > <groupId > com.taiji</groupId > <version > 1.0-SNAPSHOT</version > </parent > <modelVersion > 4.0.0</modelVersion > <artifactId > shop-common</artifactId > <dependencies > <dependency > <groupId > org.springframework.boot</groupId > <artifactId > spring-boot-starter-data-jpa</artifactId > <version > 2.3.0.RELEASE</version > </dependency > <dependency > <groupId > org.projectlombok</groupId > <artifactId > lombok</artifactId > <version > 1.18.2</version > </dependency > <dependency > <groupId > com.alibaba</groupId > <artifactId > fastjson</artifactId > <version > 1.2.56</version > </dependency > <dependency > <groupId > mysql</groupId > <artifactId > mysql-connector-java</artifactId > <version > 5.1.6</version > </dependency > </dependencies > </project >
2 创建实体类
1 2 3 4 5 6 7 8 9 10 11 12 @Entity(name = "shop_user") @Data public class User @Id @GeneratedValue(strategy = GenerationType.IDENTITY) private Integer uid;private String username;private String password;private String telephone;
1 2 3 4 5 6 7 8 9 10 11 @Entity(name = "shop_product") @Data public class Product @Id @GeneratedValue(strategy = GenerationType.IDENTITY) private Integer pid;private String pname;private Double pprice;private Integer stock;
1 2 3 4 5 6 7 8 9 10 11 12 13 14 15 @Entity(name = "shop_order") @Data public class Order @Id @GeneratedValue(strategy = GenerationType.IDENTITY) private Long oid;private Integer uid;private String username;private Integer pid;private String pname;private Double pprice;private Integer number;
2.4 创建用户微服务 步骤:
创建模块 导入依赖
创建SpringBoot主类
加入配置文件
创建必要的接口和实现类(controller service dao)
新建一个shop-user 模块,然后进行下面操作
1 创建pom.xml
1
2
3
4
5
6
7
8
9
10
11
12
13
14
15
16
17
18
19
20
<?xml version="1.0" encoding="UTF-8"?> <project xmlns ="http://maven.apache.org/POM/4.0.0" xmlns:xsi ="http://www.w3.org/2001/XMLSchema-instance" xsi:schemaLocation ="http://maven.apache.org/POM/4.0.0 http://maven.apache.org/xsd/maven-4.0.0.xsd" > <parent > <artifactId > springcloud-alibaba</artifactId > <groupId > com.taiji</groupId > <version > 1.0-SNAPSHOT</version > </parent > <modelVersion > 4.0.0</modelVersion > <artifactId > shop-user</artifactId > <dependencies > <dependency > <groupId > com.taiji</groupId > <artifactId > shop-common</artifactId > <version > 1.0-SNAPSHOT</version > </dependency > </dependencies > </project >
2 编写主类UserApplication.java
1
2
3
4
5
6
@SpringBootApplication public class UserApplication public static void main (String[] args)
3 创建配置文件application.yml
1
2
3
4
5
6
7
8
9
10
11
12
13
14
15
16
server: port: 8071 spring: application: name: service-user datasource: driver-class-name: com.mysql.jdbc.Driver url: jdbc:mysql:///shop?serverTimezone=UTC&useUnicode=true&characterEncoding=utf-8&useSSL=true username: root password: root jpa: properties: hibernate: hbm2ddl: auto: update dialect: org.hibernate.dialect.MySQL5InnoDBDialect
2.5 创建商品微服务 1 创建一个名为shop_product 的模块,并添加springboot依赖
1
2
3
4
5
6
7
8
9
10
11
12
13
14
15
16
17
18
19
20
21
22
23
24
<?xml version="1.0" encoding="UTF-8"?> <project xmlns ="http://maven.apache.org/POM/4.0.0" xmlns:xsi ="http://www.w3.org/2001/XMLSchema-instance" xsi:schemaLocation ="http://maven.apache.org/POM/4.0.0 http://maven.apache.org/xsd/maven-4.0.0.xsd" > <parent > <artifactId > springcloud-alibaba</artifactId > <groupId > com.taiji</groupId > <version > 1.0-SNAPSHOT</version > </parent > <modelVersion > 4.0.0</modelVersion > <artifactId > shop-product</artifactId > <dependencies > <dependency > <groupId > org.springframework.boot</groupId > <artifactId > spring-boot-starter-web</artifactId > </dependency > <dependency > <groupId > com.taiji</groupId > <artifactId > shop-common</artifactId > <version > 1.0-SNAPSHOT</version > </dependency > </dependencies > </project >
2 创建工程的主类ProductApplication.java
1
2
3
4
5
6
@SpringBootApplication public class ProductApplication public static void main (String[] args)
3 创建配置文件application.yml
1
2
3
4
5
6
7
8
9
10
11
12
13
14
15
16
server: port: 8081 spring: application: name: service-product datasource: driver-class-name: com.mysql.jdbc.Driver url: jdbc:mysql:///shop?serverTimezone=UTC&useUnicode=true&characterEncoding=utf-8&useSSL=true username: root password: root jpa: properties: hibernate: hbm2ddl: auto: update dialect: org.hibernate.dialect.MySQL5InnoDBDialect
4 创建ProductDao接口
1
2
public interface ProductDao extends JpaRepository <Product ,Integer >
5 创建ProductService接口和实现类
1
2
3
public interface ProductService Product findByPid (Integer pid) ;
1
2
3
4
5
6
7
8
9
@Service public class ProductServiceImpl implements ProductService @Autowired private ProductDao productDao;public Product findByPid (Integer pid) return productDao.findById(pid).get();
6 创建Controller
1
2
3
4
5
6
7
8
9
10
11
12
13
14
15
16
17
@RestController @Slf4j public class ProductController @Autowired private ProductService productService;@RequestMapping("/product/{pid}") public Product product (@PathVariable("pid") Integer pid) "接下来要进行{}号商品信息的查询" ,pid);"商品信息查询成功,内容为{}" , JSON.toJSONString(product));return product;
7 启动工程,等到数据库表创建完毕之后,加入测试数据
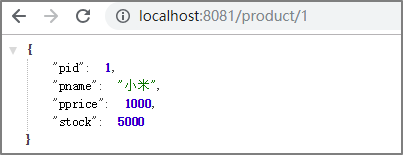
1
2
3
4
INSERT INTO shop_product VALUE (NULL ,'小米' ,'1000' ,'5000' );INSERT INTO shop_product VALUE (NULL ,'华为' ,'2000' ,'5000' );INSERT INTO shop_product VALUE (NULL ,'苹果' ,'3000' ,'5000' );INSERT INTO shop_product VALUE (NULL ,'OPPO' ,'4000' ,'5000' );
8 通过浏览器访问服务
2.6 创建订单微服务 1 创建一个名为shop-order 的模块,并添加springboot依赖
1
2
3
4
5
6
7
8
9
10
11
12
13
14
15
16
17
18
19
20
21
22
23
24
25
<?xml version="1.0" encoding="UTF-8"?> <project xmlns ="http://maven.apache.org/POM/4.0.0" xmlns:xsi ="http://www.w3.org/2001/XMLSchema-instance" xsi:schemaLocation ="http://maven.apache.org/POM/4.0.0 http://maven.apache.org/xsd/maven-4.0.0.xsd" > <parent > <artifactId > springcloud-alibaba</artifactId > <groupId > com.taiji</groupId > <version > 1.0-SNAPSHOT</version > </parent > <modelVersion > 4.0.0</modelVersion > <artifactId > shop-order</artifactId > <dependencies > <dependency > <groupId > org.springframework.boot</groupId > <artifactId > spring-boot-starter-web</artifactId > </dependency > <dependency > <groupId > com.taiji</groupId > <artifactId > shop-common</artifactId > <version > 1.0-SNAPSHOT</version > </dependency > </dependencies > </project >
2 创建工程的主类OrderApplication.java
1
2
3
4
5
6
@SpringBootApplication public class UserApplication public static void main (String[] args)
3 创建配置文件application.yml
1
2
3
4
5
6
7
8
9
10
11
12
13
14
15
16
server: port: 8091 spring: application: name: service-order datasource: driver-class-name: com.mysql.jdbc.Driver url: jdbc:mysql:///shop?serverTimezone=UTC&useUnicode=true&characterEncoding=utf-8&useSSL=true username: root password: root jpa: properties: hibernate: hbm2ddl: auto: update dialect: org.hibernate.dialect.MySQL5InnoDBDialect
4 创建OrderDao接口
1
2
public interface OrderDao extends JpaRepository <Order ,Integer >
5 创建OrderService接口和实现类
1
2
3
public interface OrderService void createOrder (Order order)
1
2
3
4
5
6
7
8
9
@Service public class OrderServiceImpl implements OrderService @Autowired private OrderDao orderDao;public void createOrder (Order order)
6 创建RestTemplate
1
2
3
4
5
6
7
8
9
10
11
@SpringBootApplication public class OrderApplication public static void main (String[] args) @Bean public RestTemplate restTemplate () return new RestTemplate();
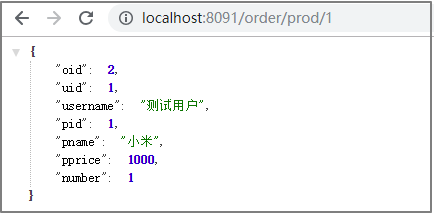
7 创建Controller
1
2
3
4
5
6
7
8
9
10
11
12
13
14
15
16
17
18
19
20
21
22
23
24
25
26
27
28
29
30
31
32
33
@RestController @Slf4j public class OrderController @Autowired private RestTemplate restTemplate;@Autowired private OrderService orderService;@RequestMapping("/order/prod/{pid}") public Order order (@PathVariable("pid") Integer pid) "接收到{}号商品的下单请求,接下来调用商品微服务查询此商品信息" , pid);"http://localhost:8081/product/" + pid, Product.class);"查询到{}号商品的信息,内容是{}" , pid, JSON.toJSONString(product));new Order();1 );"测试用户" );1 );"创建订单成功,订单信息为{}" , JSON.toJSONString(order));return order;
8 启动工程,通过浏览器访问服务进行测试