一、SpringBoot简介 提起SpringBoot就不得不说Spring,Spring是Java企业版(Java Enterprise Edition,JEE,也称J2EE)的轻量级代替品。无需开发重量级的Enterprise JavaBean(EJB),Spring为企业级Java开发提供了一种相对简单的方法,通过依赖注入和面向切面编程,用简单的Java对象(Plain Old Java Object,POJO)实现了EJB的功能。
虽然Spring的组件代码是轻量级的,但它的配置却是重量级的。一开始,Spring用XML配置,而且是很多XML配置。Spring 2.5引入了基于注解的组件扫描,这消除了大量针对应用程序自身组件的显式XML配置。Spring 3.0引入了基于Java的配置,这是一种类型安全的可重构配置方式,可以代替XML。
所有这些配置都代表了开发时的损耗。因为在思考Spring特性配置和解决业务问题之间需要进行思维切换,所以编写配置挤占了编写应用程序逻辑的时间。和所有框架一样,Spring实用,但与此同时它要求的回报也不少。除此之外,项目的依赖管理也是一件耗时耗力的事情。在环境搭建时,需要分析要导入哪些库的坐标,而且还需要分析导入与之有依赖关系的其他库的坐标,一旦选错了依赖的版本,随之而来的不兼容问题就会严重阻碍项目的开发进度。
SpringBoot对上述Spring的缺点进行的改善和优化,基于约定优于配置 的思想,可以让开发人员不必在配置与逻辑业务之间进行思维的切换,全身心的投入到逻辑业务的代码编写中,从而大大提高了开发的效率,一定程度上缩短了项目周期。
一般把Spring Boot称为搭建程序的脚手架或者说是便捷搭建基于Spring的工程脚手架。其最主要作用就是帮助开发人员快速的构建庞大的spring项目,并且尽可能的减少一切xml配置,做到开箱即用,迅速上手,让开发人员关注业务而非配置。
1.1 SpringBoot的特点
创建独立的Spring应用,为所有 Spring 的开发者提供一个非常快速的、广泛接受的入门体验。
直接嵌入应用服务器,如tomcat、jetty、undertow等;不需要去部署war包。
提供固定的启动器依赖去简化组件配置;实现开箱即用(启动器starter-其实就是Spring Boot提供的一个jar包),通过自己设置参数(.properties或.yml的配置文件),即可快速使用。
自动地配置Spring和其它有需要的第三方依赖。
提供了一些大型项目中常见的非功能性特性,如内嵌服务器、安全、指标,健康检测、外部化配置等。
绝对没有代码生成,也无需 XML 配置。
2.2 SpringBoot的核心功能
起步依赖
起步依赖本质上是一个Maven项目对象模型(Project Object Model,POM),定义了对其他库的传递依赖,这些东西加在一起即支持某项功能。简单的说,起步依赖就是将具备某种功能的坐标打包到一起,并提供一些默认的功能。
自动配置
SpringBoot的自动配置是一个运行时(更准确地说,是应用程序启动时)的过程,考虑了众多因素,才决定Spring配置应该用哪个,不该用哪个。该过程是Spring自动完成的。
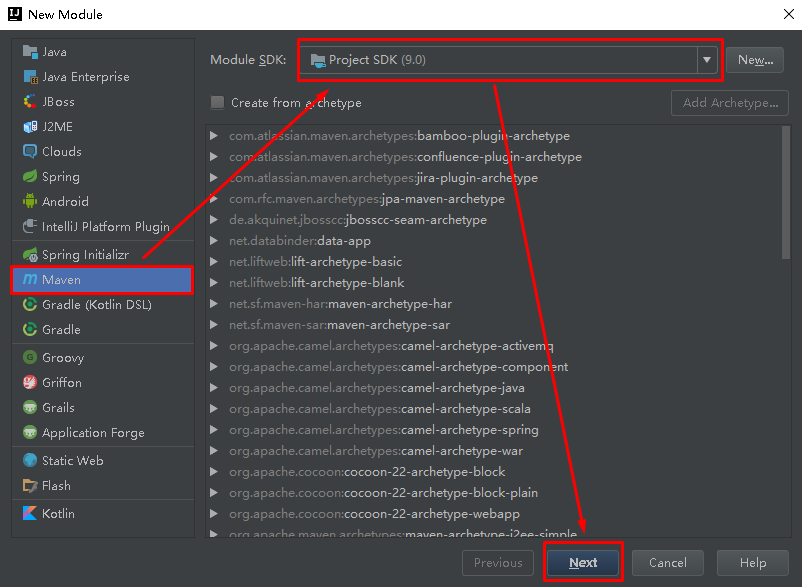
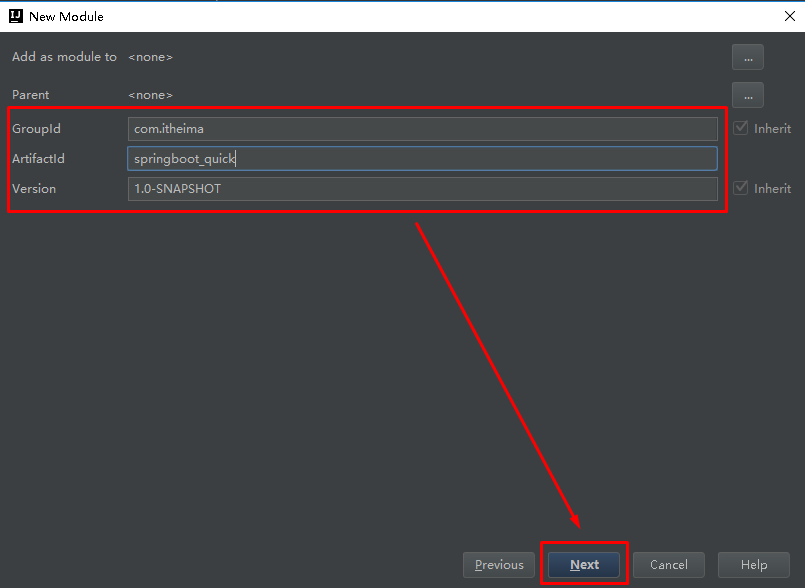
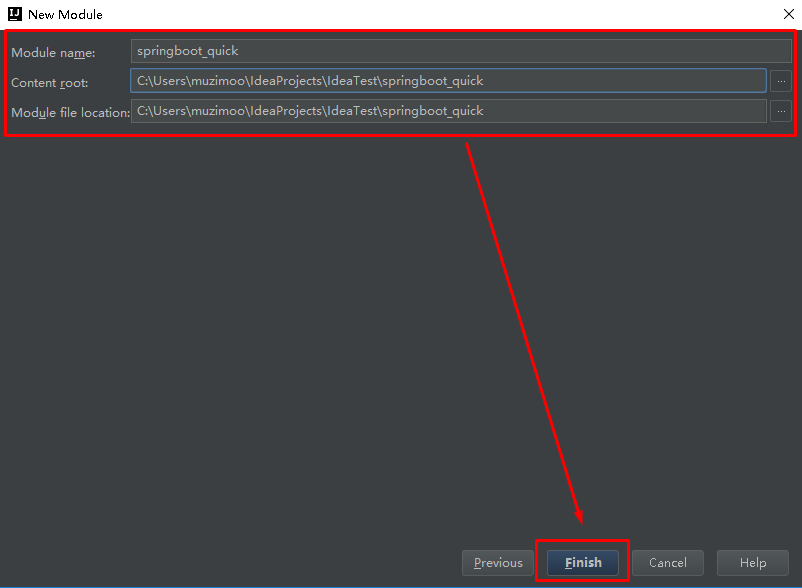
二、SpringBoot快速入门 2.1 搭建SpringBoot项目 2.1.1 创建Maven工程 使用idea工具创建一个maven工程,该工程为普通的java工程即可
2.1.2 添加SpringBoot的起步依赖 SpringBoot要求,项目要继承SpringBoot的起步依赖spring-boot-starter-parent
1 2 3 4 5 <parent > <groupId > org.springframework.boot</groupId > <artifactId > spring-boot-starter-parent</artifactId > <version > 2.0.1.RELEASE</version > </parent >
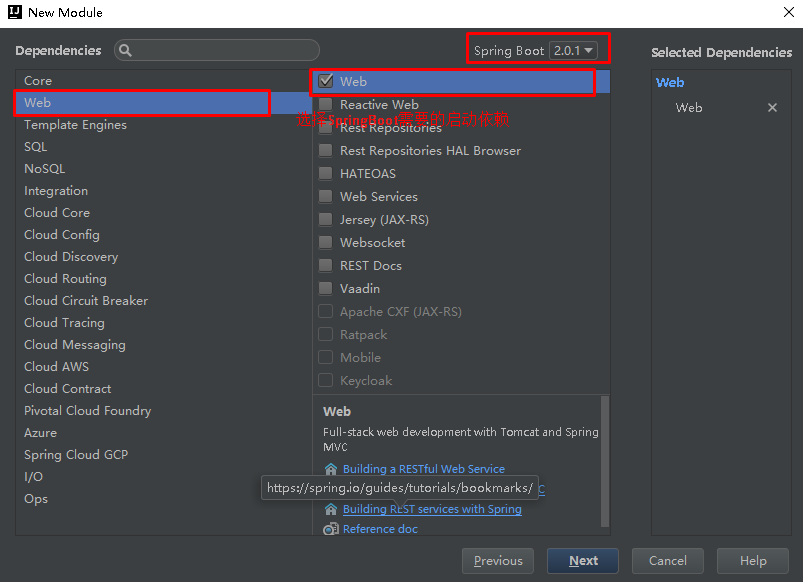
SpringBoot要集成SpringMVC进行Controller的开发,所以项目要导入web的启动依赖
1 2 3 4 5 6 <dependencies > <dependency > <groupId > org.springframework.boot</groupId > <artifactId > spring-boot-starter-web</artifactId > </dependency > </dependencies >
2.1.3 编写SpringBoot引导类 要通过SpringBoot提供的引导类起步SpringBoot才可以进行访问
1
2
3
4
5
6
7
8
9
10
11
12
13
package com.itheima;import org.springframework.boot.SpringApplication;import org.springframework.boot.autoconfigure.SpringBootApplication;@SpringBootApplication public class MySpringBootApplication public static void main (String[] args)
2.1.4 编写Controller 在引导类MySpringBootApplication同级包或者子级包中创建QuickStartController
1
2
3
4
5
6
7
8
9
10
11
12
13
14
15
16
package com.itheima.controller;import org.springframework.stereotype.Controller;import org.springframework.web.bind.annotation.RequestMapping;import org.springframework.web.bind.annotation.ResponseBody;@Controller public class QuickStartController @RequestMapping("/quick") @ResponseBody public String quick () return "springboot 访问成功!" ;
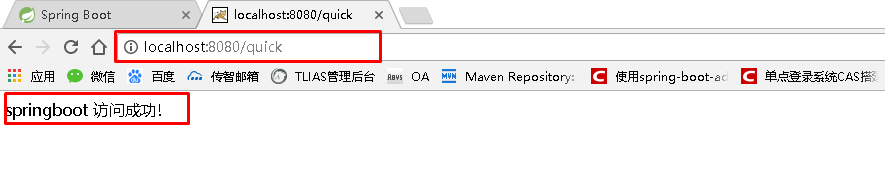
2.1.5 测试 执行SpringBoot起步类的主方法,控制台打印日志如下:
1
2
3
4
5
6
7
8
9
10
11
12
13
14
. ____ _ __ _ _
通过日志发现,Tomcat started on port(s): 8080 (http) with context path ‘’
tomcat已经起步,端口监听8080,web应用的虚拟工程名称为空
打开浏览器访问url地址为:http://localhost:8080/quick
2.2 SpringBoot工程热部署 我们在开发中反复修改类、页面等资源,每次修改后都是需要重新启动才生效,这样每次启动都很麻烦,浪费了大量的时间,我们可以在修改代码后不重启就能生效,在 pom.xml 中添加如下配置就可以实现这样的功能,我们称之为热部署。
1 2 3 4 5 <dependency > <groupId > org.springframework.boot</groupId > <artifactId > spring-boot-devtools</artifactId > </dependency >
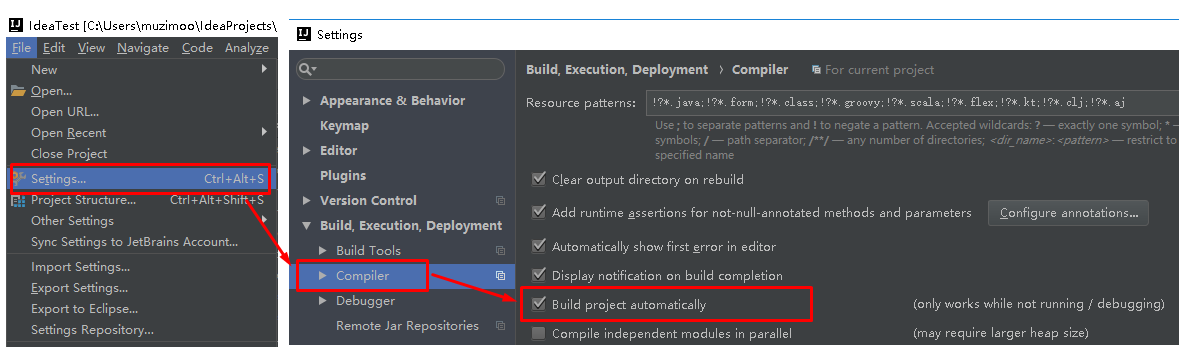
注意:IDEA进行SpringBoot热部署失败原因
出现这种情况,并不是热部署配置问题,其根本原因是因为Intellij IEDA默认情况下不会自动编译,需要对IDEA进行自动编译的设置,如下:
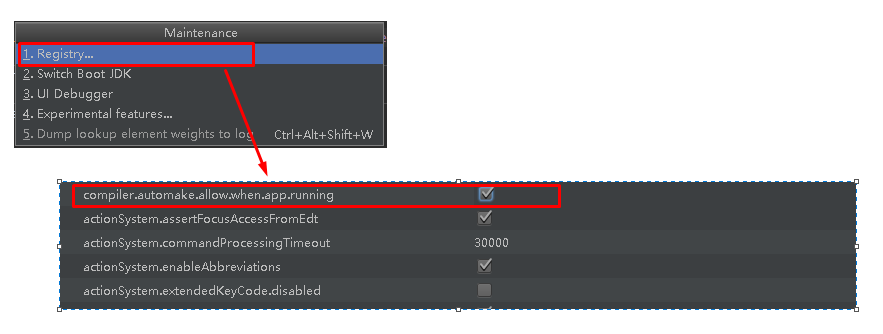
然后 Shift+Ctrl+Alt+/,选择Registry
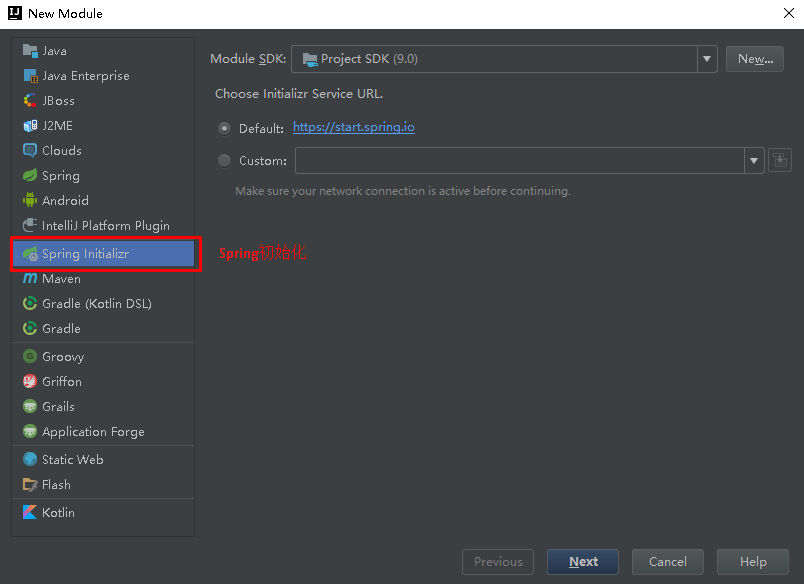
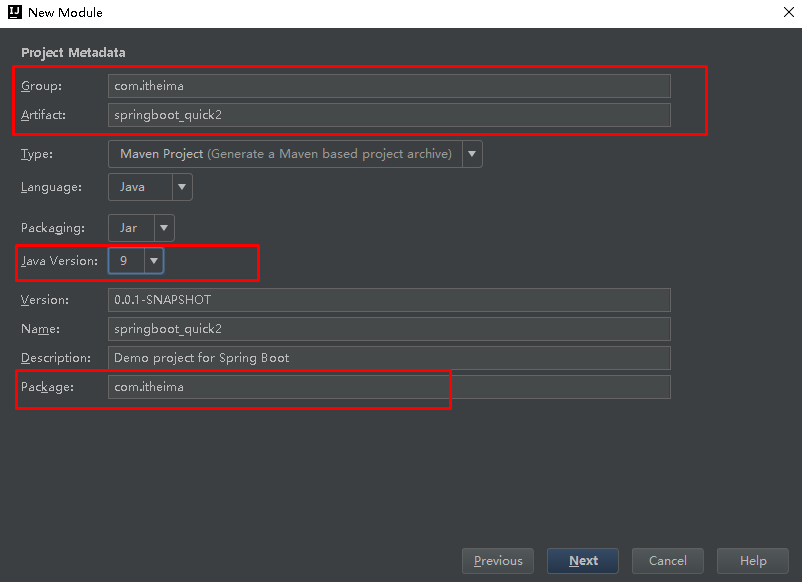
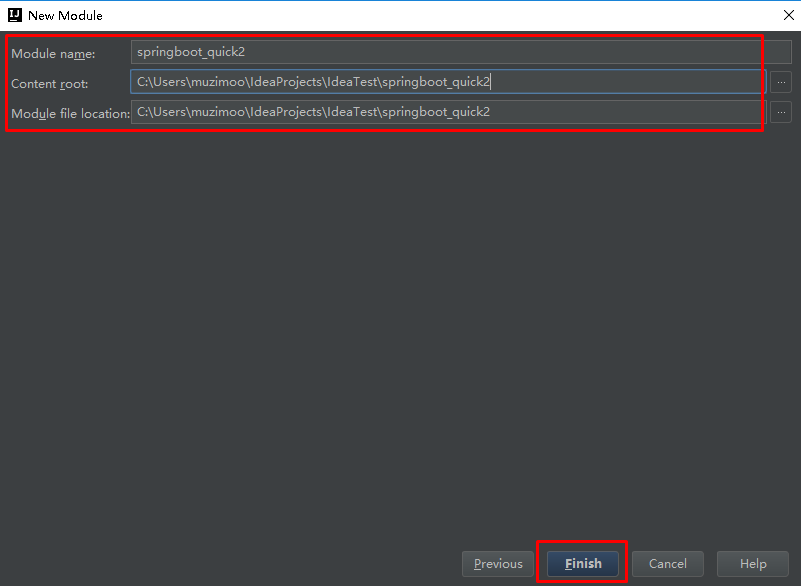
2.3 使用idea快速创建SpringBoot项目
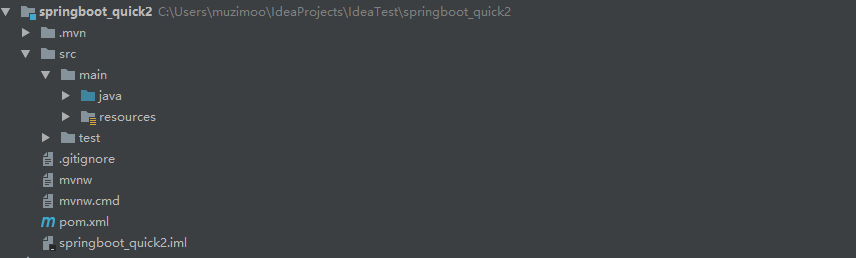
通过idea快速创建的SpringBoot项目的pom.xml中已经导入了我们选择的web的起步依赖的坐标
1
2
3
4
5
6
7
8
9
10
11
12
13
14
15
16
17
18
19
20
21
22
23
24
25
26
27
28
29
30
31
32
33
34
35
36
37
38
39
40
41
42
43
44
45
46
47
48
49
50
51
<?xml version="1.0" encoding="UTF-8"?> <project xmlns ="http://maven.apache.org/POM/4.0.0" xmlns:xsi ="http://www.w3.org/2001/XMLSchema-instance" xsi:schemaLocation ="http://maven.apache.org/POM/4.0.0 http://maven.apache.org/xsd/maven-4.0.0.xsd" > <modelVersion > 4.0.0</modelVersion > <groupId > com.itheima</groupId > <artifactId > springboot_quick2</artifactId > <version > 0.0.1-SNAPSHOT</version > <packaging > jar</packaging > <name > springboot_quick2</name > <description > Demo project for Spring Boot</description > <parent > <groupId > org.springframework.boot</groupId > <artifactId > spring-boot-starter-parent</artifactId > <version > 2.0.1.RELEASE</version > <relativePath /> </parent > <properties > <project.build.sourceEncoding > UTF-8</project.build.sourceEncoding > <project.reporting.outputEncoding > UTF-8</project.reporting.outputEncoding > <java.version > 9</java.version > </properties > <dependencies > <dependency > <groupId > org.springframework.boot</groupId > <artifactId > spring-boot-starter-web</artifactId > </dependency > <dependency > <groupId > org.springframework.boot</groupId > <artifactId > spring-boot-starter-test</artifactId > <scope > test</scope > </dependency > </dependencies > <build > <plugins > <plugin > <groupId > org.springframework.boot</groupId > <artifactId > spring-boot-maven-plugin</artifactId > </plugin > </plugins > </build > </project >
可以使用快速入门的方式创建Controller进行访问,此处不再赘述
2.4 SpringBoot项目发布 2.4.1 项目打包 添加项目的pom.xml插件;在pom.xml要显式的加入插件spring-boot-maven-plugin,否则无法产生 jar清单文件,导致打出来的 jar 无法使用命令运行;
1 2 3 4 5 6 7 8 9 <build > <plugins > <plugin > <groupId > org.springframework.boot</groupId > <artifactId > spring-boot-maven-plugin</artifactId > </plugin > </plugins > </build >
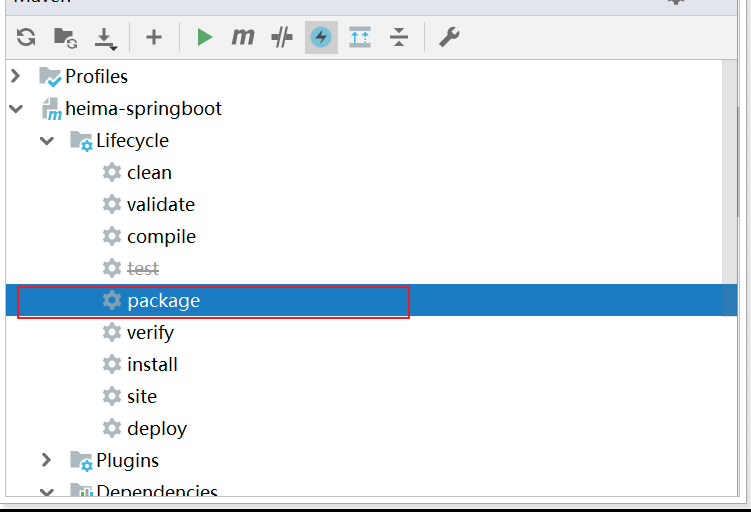
使用maven的命令package打包;其中执行package会依次执行package之上的命令,如果无需测试,可以在mavan中先禁止test再进行打包。
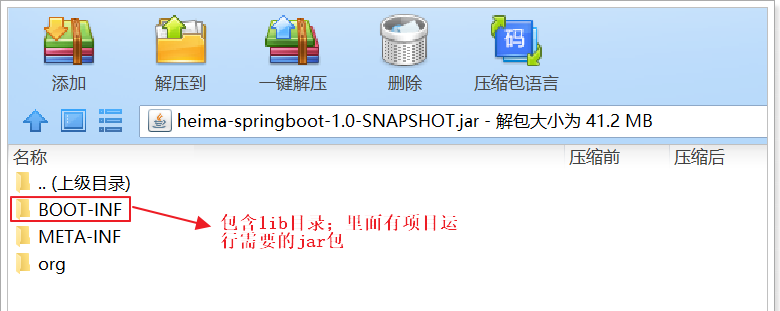
之后生成的包将出现在项目下的target目录中,用压缩文件打开这个包:
【注意】在查看打出的 jar 的时候,将发现 jar 包里面包含 jar 包;这样的包称为 fatJar(肥包)
2.4.2 运行 运行打出来的包;使用命令: java –jar 包全名或者写一个 bat 文件,里面包含java –jar 包全名;这样就可以双击启动应用。
1 java -jar heima-springboot-1 1.0-SNAPSHOT.jar
三、SpringBoot的配置 3.1 Spring配置历史 事实上,在Spring3.0开始,Spring官方就已经开始推荐使用java配置来代替传统的xml配置了,我们不妨来回顾一下Spring的历史:
Spring1.0时代
Spring2.0时代
Spring3.0及以后
3.2 通过java注解读取配置 在传统的Spring项目中,我们通过配置xml文件来声明一个Bean,例如配置一个数据库连接池:
1 2 3 4 5 6 <bean id ="dataSource" class ="com.alibaba.druid.pool.DruidDataSource" init-method ="init" destroy-method ="close" > <property name ="url" value ="${jdbc.url}" /> <property name ="username" value ="${jdbc.username}" /> <property name ="password" value ="${jdbc.password}" /> </bean >
下面介绍三种使用注解的方式读取配置文件,首先创建一个配置文件项目\src\main\resources\jdbc.properties:
1
2
3
4
jdbc.driverClassName=com.mysql.jdbc.Driver
3.2.1 通过@value的方式 创建一个JdbcConfig.java的配置类:
1
2
3
4
5
6
7
8
9
10
11
12
13
14
15
16
17
18
19
20
21
22
@Configuration @PropertySource("classpath:jdbc.properties") public class JdbcConfig @Value("${jdbc.url}") @Value("${jdbc.driverClassName}") @Value("${jdbc.username}") @Value("${jdbc.password}") @Bean public DataSource dataSource () new DruidDataSource();return dataSource;
@Configuration:声明我们JdbcConfig是一个配置类
@PropertySource:指定属性文件的路径是:classpath:jdbc.properties
通过@Value为属性注入值
通过@Bean将 dataSource() 方法声明为一个注册Bean的方法,Spring会自动调用该方法,将方法的返回值加入Spring容器中。
然后我们就可以在任意位置通过@Autowired 注入DataSource了!
1
2
3
4
5
6
7
8
9
10
11
@RestController public class HelloController @Autowired private DataSource dataSource;@GetMapping("hello") public String hello () "dataSource = " + dataSource);return "hello, spring boot!" ;
3.2.2 通过@ConfigurationProperties的方式 我们创建一个JdbcProperties.java配置类:
1
2
3
4
5
6
7
8
9
10
11
import org.springframework.boot.context.properties.ConfigurationProperties;@ConfigurationProperties(prefix = "jdbc") public class JdbcProperties private String url;private String driverClassName;private String username;private String password;
在类上通过@ConfigurationProperties注解声明当前类为属性读取类。
prefix=”jdbc” 读取属性文件中,前缀为jdbc的值。
在类上定义各个属性,名称必须与属性文件中jdbc. 后面部分一致。
需要注意的是 ,这里我们并没有指定属性文件的地址,所以我们需要把jdbc.properties名称改为 application.properties,这是SpringBoot默认读取的属性文件名。
接下来,修改JdbcConfig.java,改为注入JdbcProperties的方式,读取到配置。
1
2
3
4
5
6
7
8
9
10
11
12
13
@Configuration @EnableConfigurationProperties(JdbcProperties.class) public class JdbcConfig @Bean public DataSource dataSource (JdbcProperties jdbc) new DruidDataSource();return dataSource;
学过Spring IOC肯定知道,我们有3种方式可以注入JdbcProperties:
@Autowired注入
1
2
@Autowired private JdbcProperties prop;
构造函数注入
1
2
3
4
private JdbcProperties prop;public JdbcConfig (Jdbcproperties prop) this .prop = prop;
声明有@Bean的方法参数注入(我们采用的这种)
1
2
3
4
@Bean public Datasource dataSource (JdbcProperties prop)
3.2.3 通过@ConfigurationProperties更优雅的方式 事实上,如果一段属性只有一个Bean需要使用,我们无需将其注入到一个类中。而是直接在需要的地方声明即可,例如只有JdbcConfig会读取JdbcProperties这种情况。再次修改JdbcConfig 类为如下代码:
1
2
3
4
5
6
7
8
9
@Configuration public class JdbcConfig @Bean @ConfigurationProperties(prefix = "jdbc") public DataSource dataSource () return new DruidDataSource();
我们直接把@ConfigurationProperties(prefix = "jdbc")声明在需要使用的@Bean 的方法上,然后SpringBoot就会自动调用这个Bean(此处是DataSource)的set方法,然后完成注入。使用的前提是:该类必须有对应属性的set方法 !
3.3 SpringBoot配置文件类型 SpringBoot是基于约定的,所以很多配置都有默认值,但如果想使用自己的配置替换默认配置的话,就可以使用application.properties或者application.yml(application.yaml)进行配置。
SpringBoot默认会从Resources目录下加载application.properties或application.yml(application.yaml)文件,其中,application.properties文件是键值对类型的文件。除了properties文件外,SpringBoot还可以使用yml文件进行配置。
3.4 yml配置文件简介 YML文件格式是YAML (YAML Aint Markup Language)编写的文件格式,YAML是一种直观的能够被电脑识别的的数据数据序列化格式,并且容易被人类阅读,容易和脚本语言交互的,可以被支持YAML库的不同的编程语言程序导入,比如: C/C++, Ruby, Python, Java, Perl, C#, PHP等。YML文件是以数据为核心的,比传统的xml方式更加简洁。
3.4.1 yml配置文件语法 配置普通数据
配置对象数据
1 2 3 4 5 6 7 8 9 10 11 12 13 person: name: haohao age: 31 addr: beijing person: {name: haohao ,age: 31 ,addr: beijing }
配置Map数据
通配置对象数据写法一致
配置数组(List、Set)数据
1 2 3 4 5 6 7 8 9 10 11 12 13 14 15 16 17 18 19 city: - beijing - tianjin - shanghai - chongqing city: [beijing ,tianjin ,shanghai ,chongqing ]student: - name: zhangsan age: 18 score: 100 - name: lisi age: 28 score: 88 - name: wangwu age: 38 score: 90
3.4.2 多个yml配置文件 当一个项目中有多个yml配置文件的时候,可以以application-**.yml命名;在application.yml中配置项目使用激活这些配置文件即可。
1 2 3 4 5 6 7 test1: url: http://www.test1.cn test2: url: http://www.test2.cn
在application.yml文件中添加如下配置:
1 2 3 4 spring: profiles: active: test1,test2
多个文件名只需要写application-之后的名称,在多个文件之间使用,隔开。
1 2 3 4 5 @Value("${test1.url}") private String testUrl1;@Value("${test2.url}") private String testUrl2;
3.5 SpringBoot配置信息的查询 上面提及过,SpringBoot的配置文件,主要的目的就是对配置信息进行修改的,但在配置时的key从哪里去查询呢?我们可以查阅SpringBoot的官方文档,文档URL 。
1 2 3 4 5 6 7 8 9 10 11 12 13 14 15 16 17 18 19 20 21 22 23 24 25 26 27 28 29 30 31 32 33 34 35 36 37 38 39 40 spring.quartz.jdbc.initialize-schema =embedded # Database schema initialization mode. spring.quartz.jdbc.schema =classpath:org/quartz/impl/jdbcjobstore/tables_@@platform@@.sql # Path to the SQL file to use to initialize the database schema. spring.quartz.job-store-type =memory # Quartz job store type. spring.quartz.properties.* = # Additional Quartz Scheduler properties. server.port =8080 # Server HTTP port. server.servlet.context-path = # Context path of the application. server.servlet.path =/ # Path of the main dispatcher servlet. spring.http.encoding.charset =UTF-8 # Charset of HTTP requests and responses. Added to the "Content-Type" header if not set explicitly. spring.jackson.date-format = # Date format string or a fully-qualified date format class name. For instance, `yyyy-MM-dd HH:mm:ss`. spring.mvc.servlet.load-on-startup =-1 # Load on startup priority of the dispatcher servlet. spring.mvc.static-path-pattern =/** # Path pattern used for static resources. spring.mvc.view.prefix = # Spring MVC view prefix. spring.mvc.view.suffix = # Spring MVC view suffix. spring.datasource.driver-class-name = # Fully qualified name of the JDBC driver. Auto-detected based on the URL by default. spring.datasource.password = # Login password of the database. spring.datasource.url = # JDBC URL of the database. spring.datasource.username = # Login username of the database. spring.elasticsearch.jest.password = # Login password. spring.elasticsearch.jest.proxy.host = # Proxy host the HTTP client should use. spring.elasticsearch.jest.proxy.port = # Proxy port the HTTP client should use. spring.elasticsearch.jest.read-timeout =3s # Read timeout. spring.elasticsearch.jest.username = # Login username.
我们可以通过配置application.poperties 或者 application.yml 来修改SpringBoot的默认配置,例如:
application.properties文件
1 2 server.port =8888 server.servlet.context-path =demo
application.yml文件
1 2 3 4 server: port: 8888 servlet: context-path: /demo
四、SpringBoot原理分析 4.1 起步依赖原理分析 4.1.1 分析spring-boot-starter-parent 按住Ctrl点击pom.xml中的spring-boot-starter-parent,跳转到了spring-boot-starter-parent的pom.xml,xml配置如下(只摘抄了部分重点配置):
1 2 3 4 5 6 <parent > <groupId > org.springframework.boot</groupId > <artifactId > spring-boot-dependencies</artifactId > <version > 2.0.1.RELEASE</version > <relativePath > ../../spring-boot-dependencies</relativePath > </parent >
按住Ctrl点击pom.xml中的spring-boot-starter-dependencies,跳转到了spring-boot-starter-dependencies的pom.xml,xml配置如下(只摘抄了部分重点配置):
1 2 3 4 5 6 7 8 9 10 11 12 13 14 15 16 17 18 19 20 21 22 23 24 25 26 27 28 29 30 31 32 33 34 35 36 37 38 39 40 41 42 43 44 45 46 47 48 49 50 <properties > <activemq.version > 5.15.3</activemq.version > <antlr2.version > 2.7.7</antlr2.version > <appengine-sdk.version > 1.9.63</appengine-sdk.version > <artemis.version > 2.4.0</artemis.version > <aspectj.version > 1.8.13</aspectj.version > <assertj.version > 3.9.1</assertj.version > <atomikos.version > 4.0.6</atomikos.version > <bitronix.version > 2.1.4</bitronix.version > <build-helper-maven-plugin.version > 3.0.0</build-helper-maven-plugin.version > <byte-buddy.version > 1.7.11</byte-buddy.version > </properties > <dependencyManagement > <dependencies > <dependency > <groupId > org.springframework.boot</groupId > <artifactId > spring-boot</artifactId > <version > 2.0.1.RELEASE</version > </dependency > <dependency > <groupId > org.springframework.boot</groupId > <artifactId > spring-boot-test</artifactId > <version > 2.0.1.RELEASE</version > </dependency > </dependencies > </dependencyManagement > <build > <pluginManagement > <plugins > <plugin > <groupId > org.jetbrains.kotlin</groupId > <artifactId > kotlin-maven-plugin</artifactId > <version > ${kotlin.version}</version > </plugin > <plugin > <groupId > org.jooq</groupId > <artifactId > jooq-codegen-maven</artifactId > <version > ${jooq.version}</version > </plugin > <plugin > <groupId > org.springframework.boot</groupId > <artifactId > spring-boot-maven-plugin</artifactId > <version > 2.0.1.RELEASE</version > </plugin > </plugins > </pluginManagement > </build >
从上面的spring-boot-starter-dependencies的pom.xml中我们可以发现,一部分坐标的版本、依赖管理、插件管理已经定义好,所以我们的SpringBoot工程继承spring-boot-starter-parent后已经具备版本锁定等配置了。所以起步依赖的作用就是进行依赖的传递。
4.1.2 分析spring-boot-starter-web 按住Ctrl点击pom.xml中的spring-boot-starter-web,跳转到了spring-boot-starter-web的pom.xml,xml配置如下(只摘抄了部分重点配置):
1 2 3 4 5 6 7 8 9 10 11 12 13 14 15 16 17 18 19 20 21 22 23 24 25 26 27 28 29 30 31 32 33 34 35 36 37 38 39 40 41 42 43 44 45 46 47 48 49 50 51 52 53 54 <?xml version="1.0" encoding="UTF-8"?> <project xsi:schemaLocation ="http://maven.apache.org/POM/4.0.0 http://maven.apache.org/xsd/maven-4.0.0.xsd" xmlns ="http://maven.apache.org/POM/4.0.0" xmlns:xsi ="http://www.w3.org/2001/XMLSchema-instance" > <modelVersion > 4.0.0</modelVersion > <parent > <groupId > org.springframework.boot</groupId > <artifactId > spring-boot-starters</artifactId > <version > 2.0.1.RELEASE</version > </parent > <groupId > org.springframework.boot</groupId > <artifactId > spring-boot-starter-web</artifactId > <version > 2.0.1.RELEASE</version > <name > Spring Boot Web Starter</name > <dependencies > <dependency > <groupId > org.springframework.boot</groupId > <artifactId > spring-boot-starter</artifactId > <version > 2.0.1.RELEASE</version > <scope > compile</scope > </dependency > <dependency > <groupId > org.springframework.boot</groupId > <artifactId > spring-boot-starter-json</artifactId > <version > 2.0.1.RELEASE</version > <scope > compile</scope > </dependency > <dependency > <groupId > org.springframework.boot</groupId > <artifactId > spring-boot-starter-tomcat</artifactId > <version > 2.0.1.RELEASE</version > <scope > compile</scope > </dependency > <dependency > <groupId > org.hibernate.validator</groupId > <artifactId > hibernate-validator</artifactId > <version > 6.0.9.Final</version > <scope > compile</scope > </dependency > <dependency > <groupId > org.springframework</groupId > <artifactId > spring-web</artifactId > <version > 5.0.5.RELEASE</version > <scope > compile</scope > </dependency > <dependency > <groupId > org.springframework</groupId > <artifactId > spring-webmvc</artifactId > <version > 5.0.5.RELEASE</version > <scope > compile</scope > </dependency > </dependencies > </project >
从上面的spring-boot-starter-web的pom.xml中我们可以发现,spring-boot-starter-web就是将web开发要使用的spring-web、spring-webmvc等坐标进行了“打包”,这样我们的工程只要引入spring-boot-starter-web起步依赖的坐标就可以进行web开发了,同样体现了依赖传递的作用。
4.2 自动配置原理解析 按住Ctrl点击查看启动类MySpringBootApplication上的注解@SpringBootApplication
1 2 3 4 5 6 @SpringBootApplication public class MySpringBootApplication public static void main (String[] args)
注解@SpringBootApplication的源码
1 2 3 4 5 6 7 8 9 10 11 12 13 14 15 16 17 18 19 20 21 @Target(ElementType.TYPE) @Retention(RetentionPolicy.RUNTIME) @Documented @Inherited @SpringBootConfiguration @EnableAutoConfiguration @ComponentScan(excludeFilters = { @Filter(type = FilterType.CUSTOM, classes = TypeExcludeFilter.class), @Filter(type = FilterType.CUSTOM, classes = AutoConfigurationExcludeFilter.class) }) public @interface SpringBootApplication {@AliasFor(annotation = EnableAutoConfiguration.class) default {};
其中,@SpringBootConfiguration这个注解上面,又有一个@Configuration注解。通过阅读@SpringBootConfiguration注解的注释我们知道:这个注解的作用就是声明当前类是一个配置类,然后Spring会自动扫描到添加了@Configuration 的类,并且读取其中的配@SpringBootConfiguration是来声明当前类是SpringBoot应用的配置类,项目中只能有一个。所以一般我们无需自己添加。@EnableAutoConfiguration:SpringBoot自动配置功能开启,按住Ctrl点击查看注解@EnableAutoConfiguration
1 2 3 4 5 6 7 8 9 @Target(ElementType.TYPE) @Retention(RetentionPolicy.RUNTIME) @Documented @Inherited @AutoConfigurationPackage @Import(AutoConfigurationImportSelector.class) public @interface EnableAutoConfiguration {
其中,@Import(AutoConfigurationImportSelector.class) 导入了AutoConfigurationImportSelector类
1 2 3 4 5 6 7 8 9 10 11 12 13 14 15 16 17 18 19 20 21 22 public String[] selectImports(AnnotationMetadata annotationMetadata) {return StringUtils.toStringArray(configurations);protected List<String> getCandidateConfigurations (AnnotationMetadata metadata, AnnotationAttributes attributes) return configurations;
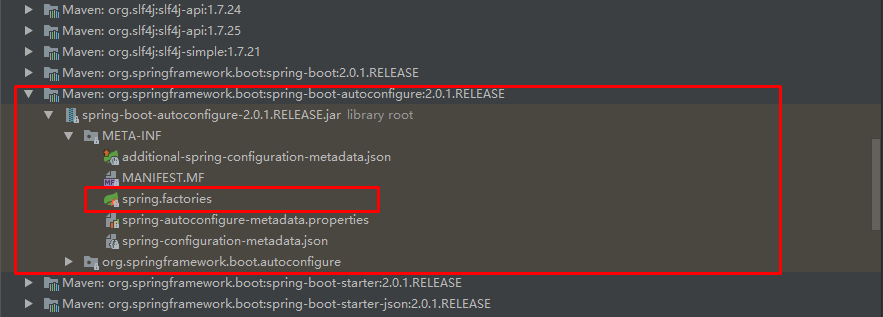
其中,SpringFactoriesLoader.loadFactoryNames 方法的作用就是从META-INF/spring.factories文件中读取指定类对应的类名称列表
spring.factories 文件中有关自动配置的配置信息如下:
1 2 3 4 5 6 7 8 9 10 ... ... ...
上面配置文件存在大量的以Configuration为结尾的类名称,这些类就是存有自动配置信息的类,而SpringApplication在获取这些类名后再加载
我们以ServletWebServerFactoryAutoConfiguration为例来分析源码:
1 2 3 4 5 6 7 8 9 10 11 12 13 @Configuration @AutoConfigureOrder(Ordered.HIGHEST_PRECEDENCE) @ConditionalOnClass(ServletRequest.class) @ConditionalOnWebApplication(type = Type.SERVLET) @EnableConfigurationProperties(ServerProperties.class) @Import({ ServletWebServerFactoryAutoConfiguration.BeanPostProcessorsRegistrar.class, ServletWebServerFactoryConfiguration.EmbeddedTomcat.class, ServletWebServerFactoryConfiguration.EmbeddedJetty.class, ServletWebServerFactoryConfiguration.EmbeddedUndertow.class }) public class ServletWebServerFactoryAutoConfiguration
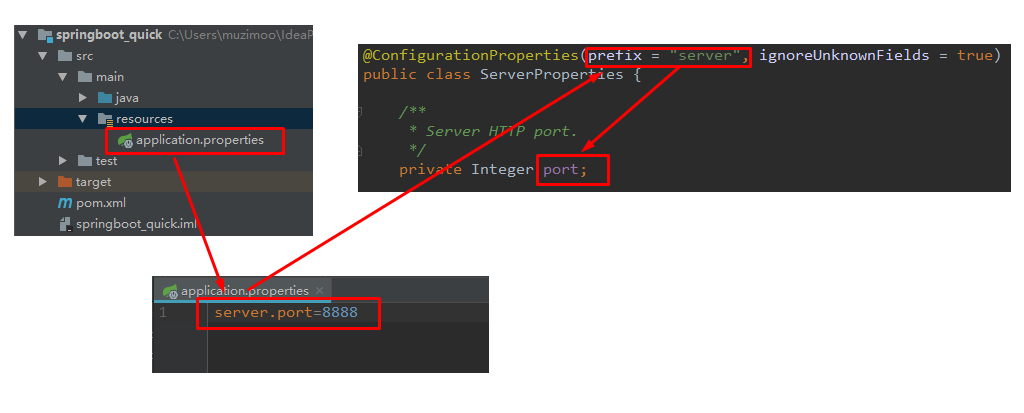
其中,@EnableConfigurationProperties(ServerProperties.class)代表加载ServerProperties服务器配置属性类
进入ServerProperties.class源码如下:
1 2 3 4 5 6 7 8 9 10 11 12 13 14 15 16 @ConfigurationProperties(prefix = "server", ignoreUnknownFields = true) public class ServerProperties private Integer port;private InetAddress address;
其中,prefix = “server” 表示SpringBoot配置文件中的前缀,SpringBoot会将配置文件中以server开始的属性映射到该类的字段中。映射关系如下:
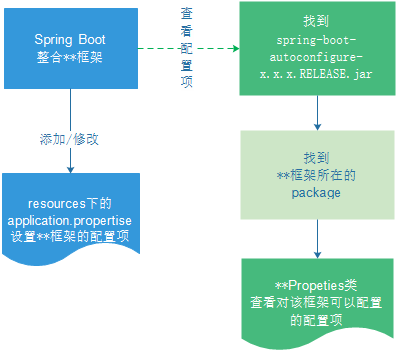
4.3 总结 SpringBoot为我们提供了默认配置,而默认配置生效的步骤:
@EnableAutoConfiguration注解会去寻找META-INF/spring.factories 文件,读取其中以EnableAutoConfiguration为key的所有类的名称,这些类就是提前写好的自动配置类。
这些类都声明了@Configuration 注解,并且通过@Bean 注解提前配置了我们所需要的一切实例,但是,这些配置不一定生效,因为有@ConditionalOn注解,满足一定条件才会生效。比如条件之一是一些相关的类要存在,我们只需要引入了相关依赖(启动器),依赖有了条件成立,自动配置生效。
如果我们自己配置了相关Bean,那么会覆盖默认的自动配置的Bean,我们还可以通过配置application.yml文件,来覆盖自动配置中的属性。
启动器
全局配置application.properties文件来application.properties和application.yml。
如果properties和yml文件都存在,如果有重叠属性,默认以properties优先。遇到需要修改的组件的配置项流程
五、SpringBoot整合其他技术 5.1 整合Lombok 我们编写pojo时,经常需要编写构造函数和getter、setter方法,属性多的时候,就非常浪费时间,使用lombok插件可以解决这个问题。在IDEA中安装lombok插件,不安装插件在IDEA中使用lombok的注解虽然编译能通过,但是源码会报错。所以为了
1 2 3 4 <dependency > <groupId > org.projectlombok</groupId > <artifactId > lombok</artifactId > </dependency >
然后可以在Bean上使用:
@Data :自动提供getter和setter、hashCode、equals、toString等方法
@Getter:自动提供getter方法
@Setter:自动提供setter方法
@Slf4j:自动在bean中提供log变量,其实用的是slf4j的日志功能。
例如;在javabean上加@Data,那么就可以省去getter和setter等方法的编写,lombok插件会自动生成。
5.2 整合SpringMVC 虽然默认配置已经可以使用SpringMVC了,不过我们有时候需要进行自定义配置。
5.2.1 配置日志打印级别 在application.yml文件中配置日志级别控制:
1 2 3 4 logging: level: com.itheima: debug org.springframework: info
5.2.2 修改默认端口 查看SpringBoot的全局属性可知,端口可以通过以修改·application.yml·配置文件,添加如下配置:
5.2.3 访问静态资源 我们的项目是一个jar工程,那么就没有webapp,我们的静态资源该放哪里呢?通过查看源码可以发现,有一个叫做ResourceProperties的类,里面就定义了静态资源的默认查找路径:
classpath:/META-INF/resources/
classpath:/resources/
classpath:/static/
classpath:/public
只要静态资源放在这些目录中任何一个,SpringMVC都会帮我们处理。我们习惯会把静态资源放在classpath:/static/目录下。我们创建目录static,并且创建test.js和test.gif,即可通过浏览器http://localhost/test.js和http://localhost/test.gif访问到。
注意:如果访问图片时候没有显示;可以先将项目先clean再启动,或者创建 public、resources 文件夹,然后图片放置到public或resources中。
5.2.4 添加拦截器 通过实现WebMvcConfigurer 并添加@Configuration 注解来实现自定义部分SpringMvc配置。
创建MyInterceptor.java拦截器
1 2 3 4 5 6 7 8 9 10 11 12 13 14 15 16 17 18 19 20 21 22 23 24 25 26 27 28 package com.itheima.interceptor;import lombok.extern.slf4j.Slf4j;import org.springframework.web.servlet.HandlerInterceptor;import org.springframework.web.servlet.ModelAndView;import javax.servlet.http.HttpServletRequest;import javax.servlet.http.HttpServletResponse;@Slf4j public class MyInterceptor implements HandlerInterceptor @Override public boolean preHandle (HttpServletRequest request, HttpServletResponse response,Object handler) throws Exception {"这是MyInterceptor拦截器的preHandle方法" );return true ;@Override public void postHandle (HttpServletRequest request, HttpServletResponse response,Object handler, ModelAndView modelAndView) throws Exception {"这是MyInterceptor拦截器的postHandle方法" );@Override public void afterCompletion (HttpServletRequest request, HttpServletResponse response, Object handler, Exception ex) throws Exception {"这是MyInterceptor拦截器的afterCompletion方法" );
定义配置类MvcConfig.java,用于注册拦截器
1 2 3 4 5 6 7 8 9 10 11 12 13 14 15 16 17 18 19 20 21 22 23 24 25 26 27 28 package com.itheima.config;import com.itheima.interceptor.MyInterceptor;import org.springframework.context.annotation.Bean;import org.springframework.context.annotation.Configuration;import org.springframework.web.servlet.config.annotation.InterceptorRegistry;import org.springframework.web.servlet.config.annotation.WebMvcConfigurer;@Configuration public class MvcConfig implements WebMvcConfigurer @Bean public MyInterceptor myInterceptor () return new MyInterceptor();@Override public void addInterceptors (InterceptorRegistry registry) "/*" );
5.3 整合jdbc和事务 spring中的jdbc连接和事务是配置中的重要一环,在SpringBoot中该如何处理呢?答案是不需要处理,我们只要找到SpringBoot提供的启动器即可,在pom.xml 文件中添加如下依赖:
1 2 3 4 <dependency > <groupId > org.springframework.boot</groupId > <artifactId > spring-boot-starter-jdbc</artifactId > </dependency >
当然,不要忘了数据库驱动,SpringBoot并不知道我们用的什么数据库,这里我们选择MySQL;同样的在pom.xml
1 2 3 4 5 <dependency > <groupId > mysql</groupId > <artifactId > mysql-connector-java</artifactId > <version > 5.1.46</version > </dependency >
至于事务,SpringBoot中通过注解来控制,就是我们熟知的@Transactional使用的时候设置在对应的类或方法上即可。UserService.java业务类中引入事务:
1 2 3 4 5 6 7 8 9 10 11 12 13 14 15 import org.springframework.stereotype.Service;import org.springframework.transaction.annotation.Transactional;@Service public class UserService public User queryById (Long id) return new User();@Transactional public void saveUser (User user) "新增用户..." );
5.4 整合连接池 在引入spring-boot-starter-jdbc启动器的时候,SpringBoot已经自动帮我们引入了一个连接池HikariCP,应该是目前速度最快的连接池了,因此,我们只需要指定连接池参数即可,打开application.yml 添加修改配置如下:
1 2 3 4 5 6 spring: datasource: driver-class-name: com.mysql.jdbc.Driver url: jdbc:mysql://localhost:3306/springboot_test username: root password: root
主要要把之前我们在JdbcConfig中配置的dataSource删除或者注释掉:
1 2 3 4 5 6 7 8 public class JdbcConfig
5.5 整合Mybatis 5.5.1 添加Mybatis的起步依赖 1 2 3 4 5 6 <dependency > <groupId > org.mybatis.spring.boot</groupId > <artifactId > mybatis-spring-boot-starter</artifactId > <version > 1.1.1</version > </dependency >
5.5.2 添加数据库驱动坐标 1 2 3 4 5 <dependency > <groupId > mysql</groupId > <artifactId > mysql-connector-java</artifactId > </dependency >
5.5.3 添加数据库连接信息 在application.properties中添加数据量的连接信息
1 2 3 4 5 spring.datasource.driverClassName =com.mysql.jdbc.Driver spring.datasource.url =jdbc:mysql://127.0.0.1:3306/test?useUnicode=true&characterEncoding=utf8 spring.datasource.username =root spring.datasource.password =root
5.5.4 创建user表 在test数据库中创建user表
1 2 3 4 5 6 7 8 9 10 11 12 13 14 15 16 17 DROP TABLE IF EXISTS `user `;CREATE TABLE `user ` (int (11 ) NOT NULL AUTO_INCREMENT,varchar (50 ) DEFAULT NULL ,varchar (50 ) DEFAULT NULL ,varchar (50 ) DEFAULT NULL ,PRIMARY KEY (`id`)= InnoDB AUTO_INCREMENT= 10 DEFAULT CHARSET= utf8;INSERT INTO `user ` VALUES ('1' , 'zhangsan' , '123' , '张三' );INSERT INTO `user ` VALUES ('2' , 'lisi' , '123' , '李四' );
5.5.5 创建实体Bean 1 2 3 4 5 6 7 8 9 10 11 12 13 public class User private Long id;private String username;private String password;private String name;
5.5.6 编写Mapper 1 2 3 4 @Mapper public interface UserMapper public List<User> queryUserList ()
注意:@Mapper标记该类是一个mybatis的mapper接口,可以被spring boot自动扫描到spring上下文中,或者,我们也可以不加注解,而是在启动类上添加扫描包注解(推荐):
1 2 3 4 5 6 7 8 @SpringBootApplication @MapperScan("com.itheima.mapper") public class Application public static void main (String[] args)
5.5.7 配置Mapper映射文件 在src\main\resources\mapper路径下加入UserMapper.xml配置文件”
1 2 3 4 5 6 7 <?xml version="1.0" encoding="utf-8" ?> <!DOCTYPE mapper PUBLIC "-//mybatis.org//DTD Mapper 3.0//EN" "http://mybatis.org/dtd/mybatis-3-mapper.dtd" > <mapper namespace ="com.itheima.mapper.UserMapper" > <select id ="queryUserList" resultType ="user" > </select > </mapper >
5.5.8 在application.properties中添加mybatis的信息 1 2 3 4 5 mybatis.type-aliases-package =com.itheima.domain mybatis.mapper-locations =classpath:mapper/*Mapper.xml
5.5.9 编写测试Controller 1 2 3 4 5 6 7 8 9 10 11 12 13 14 @Controller public class MapperController @Autowired private UserMapper userMapper;@RequestMapping("/queryUser") @ResponseBody public List<User> queryUser () return users;
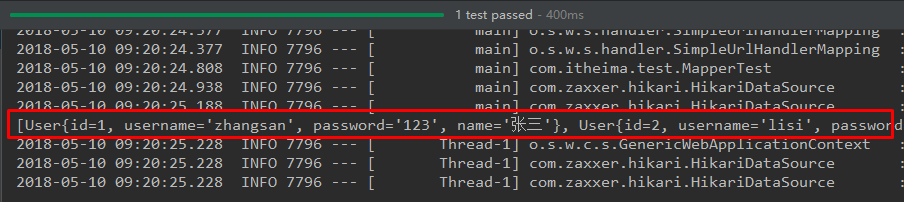
5.5.10 测试
5.6 整合Spring Data JPA 5.6.1 添加Spring Data JPA的起步依赖 1 2 3 4 5 <dependency > <groupId > org.springframework.boot</groupId > <artifactId > spring-boot-starter-data-jpa</artifactId > </dependency >
5.6.2 添加数据库驱动依赖 1 2 3 4 5 <dependency > <groupId > mysql</groupId > <artifactId > mysql-connector-java</artifactId > </dependency >
5.6.3 在application.properties中配置数据库和jpa的相关属性 1 2 3 4 5 6 7 8 9 10 11 12 spring.datasource.driverClassName =com.mysql.jdbc.Driver spring.datasource.url =jdbc:mysql://127.0.0.1:3306/test?useUnicode=true&characterEncoding=utf8 spring.datasource.username =root spring.datasource.password =root spring.jpa.database =MySQL spring.jpa.show-sql =true spring.jpa.generate-ddl =true spring.jpa.hibernate.ddl-auto =update spring.jpa.hibernate.naming_strategy =org.hibernate.cfg.ImprovedNamingStrategy
5.6.4 创建实体配置实体 1 2 3 4 5 6 7 8 9 10 11 12 13 14 15 @Entity public class User @Id @GeneratedValue(strategy = GenerationType.IDENTITY) private Long id;private String username;private String password;private String name;
5.6.5 编写UserRepository 1 2 3 public interface UserRepository extends JpaRepository <User ,Long >public List<User> findAll ()
5.6.6 编写测试类 1 2 3 4 5 6 7 8 9 10 11 12 13 14 @RunWith(SpringRunner.class) @SpringBootTest(classes=MySpringBootApplication.class) public class JpaTest @Autowired private UserRepository userRepository;@Test public void test ()
5.6.7 控制台打印信息
注意:如果是jdk9,执行报错如下:
原因:jdk缺少相应的jar
解决方案:手动导入对应的maven坐标,如下:
1 2 3 4 5 6 <dependency > <groupId > javax.xml.bind</groupId > <artifactId > jaxb-api</artifactId > <version > 2.3.0</version > </dependency >
5.7 整合Junit测试 5.7.1 添加Junit的起步依赖 1 2 3 4 5 6 <dependency > <groupId > org.springframework.boot</groupId > <artifactId > spring-boot-starter-test</artifactId > <scope > test</scope > </dependency >
5.7.2 编写测试类 1 2 3 4 5 6 7 8 9 10 11 12 13 14 15 16 17 18 19 20 21 22 23 24 25 26 27 package com.itheima.test;import com.itheima.MySpringBootApplication;import com.itheima.domain.User;import com.itheima.mapper.UserMapper;import org.junit.Test;import org.junit.runner.RunWith;import org.springframework.beans.factory.annotation.Autowired;import org.springframework.boot.test.context.SpringBootTest;import org.springframework.test.context.junit4.SpringRunner;import java.util.List;@RunWith(SpringRunner.class) @SpringBootTest(classes = MySpringBootApplication.class) public class MapperTest @Autowired private UserMapper userMapper;@Test public void test ()
其中,SpringRunner继承自SpringJUnit4ClassRunner,使用哪一个Spring提供的测试测试引擎都可以
1 public final class SpringRunner extends SpringJUnit4ClassRunner
@SpringBootTest的属性指定的是引导类的字节码对象
5.7.3 控制台打印信息
5.8 整合Redis 5.8.1 添加redis的起步依赖 1 2 3 4 5 <dependency > <groupId > org.springframework.boot</groupId > <artifactId > spring-boot-starter-data-redis</artifactId > </dependency >
5.8.2 配置redis的连接信息 1 2 3 spring.redis.host =127.0.0.1 spring.redis.port =6379
5.8.3 注入RedisTemplate测试redis操作 1 2 3 4 5 6 7 8 9 10 11 12 13 14 15 16 17 18 19 20 21 22 23 24 25 26 27 28 29 30 31 32 33 34 35 36 37 38 39 40 41 42 43 44 45 46 47 48 49 50 51 52 53 54 55 56 57 58 59 60 61 62 @RunWith(SpringRunner.class) @SpringBootTest(classes = SpringbootJpaApplication.class) public class RedisTest @Autowired private UserRepository userRepository;@Autowired private RedisTemplate<String, String> redisTemplate;@Test public void test () throws JsonProcessingException "user.findAll" ).get();if (null ==userListData){new ObjectMapper();"user.findAll" ).set(userListData);"===============从数据库获得数据===============" );else {"===============从redis缓存中获得数据===============" );@Test public void test2 () "str" ).set("heima" );"str = " + redisTemplate.opsForValue().get("str" ));"h_key" ).put("name" , "黑马" );"h_key" ).put("age" , 13 );"h_key" ).keys();"hash散列所有的域:" + set);"h_key" ).values();"hash散列所有的域值:" + list);"l_key" ).leftPush("c" );"l_key" ).leftPush("b" );"l_key" ).leftPush("a" );"l_key" ).range(0 , -1 );"列表的值:" + list);"set_key" ).add("a" , "b" , "c" );"set_key" ).members();"集合的元素:" + set);"z_key" ).add("a" , 30 );"z_key" ).add("b" , 20 );"z_key" ).add("c" , 10 );"z_key" ).range(0 , -1 );"有序集合的元素:" + set);