IOC IOC全称Inverse Of Control ,中文名控制反转 ,是spring框架中一种降低程序耦合度(降低程序依赖关系)的设计思想。它的主要目的就是将对象的创建控制权完全交给spring提供的容器处理,由容器统一创建,调用方只需关注对象实现的功能,而无需关注对象是如何创建的。
实现原理
使用反射来创建对象,而避免使用new关键字。
通过读取配置文件来获取要创建的对象全限定类名。
因为是通过反射来创建的,所以编译期不依赖,运行时才依赖。
创建一个生成bean的工厂类BeanFactory,在类加载的时候通过读取配置文件bean.properties,将对象生成好并存放在字典中,此方式每个对象都是一个单例 。
1
2
3
4
5
6
7
8
9
10
11
12
13
14
15
16
17
18
19
20
21
22
23
24
25
26
27
28
29
30
31
32
33
34
35
36
37
38
39
40
41
42
43
44
public class BeanFactory private static Properties props;private static Map<String,Object> beans;static {try {new Properties();"bean.properties" );new HashMap<String,Object>();while (keys.hasMoreElements()){catch (Exception e){throw new ExceptionInInitializerError("初始化properties失败!" );public static Object getBean (String beanName) return beans.get(beanName);
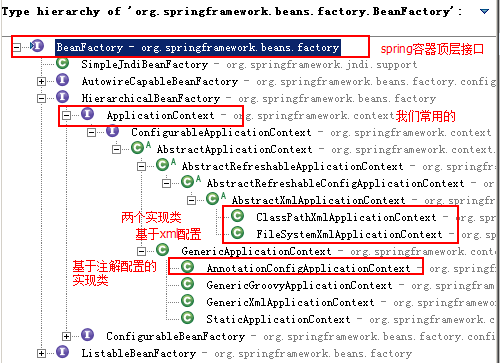
Spring的IOC实现 Spring中的bean工厂类结构图:
1
2
3
4
5
6
7
8
public static void main (String[] args) new ClassPathXmlApplicationContext("bean.xml" );"accountService" ,IAccountDao.class);
ApplicationContext有三种常用的实现类
ClassPathXmlApplicationContext :从类的根路径下加载配置文件,要求配置文件必须在类路径下,不在的话,加载不了。(常用方式)FileSystemXmlApplicationContext :可以加载磁盘任意路径下的配置文件。(必须有访问权限)AnnotationConfigApplicationContext :通过读取注解来创建容器对象。
核心容器的两个接口BeanFactory和ApplicationContext的区别
BeanFactory是Spring容器中的顶层接口,ApplicationContext是它的子接口。
ApplicationContext :采用立即加载的方式,只要一读取完配置文件马上就创建配置文件中配置的对象,适用于单例对象。BeanFactory: 采用延迟加载的方式,调用根据id获取对象的方法时,才真正的创建对象,适用于多例对象。
创建BeanFactory对象:
1
2
3
4
5
public static void main (String[] args) new ClassPathResource("bean.xml" );new XmlBeanFactory(resource);"accountService" );
bean标签的使用说明 bean.xml用于配置对象以便spring创建,默认情况下它调用的是类中的无参构造函数。如果没有无参构造函数则不能创建成功。
bean标签属性
属性
说明
id
给对象在容器中提供一个唯一标识,用于获取对象
class
指定类的全限定类名,用于反射创建对象,默认情况下调用无参构造函数。
scope
指定对象的作用范围
init-method
指定类中的初始化方法名称
destroy-method
指定类中销毁方法名称
bean的作用范围和生命周期
作用范围
生命周期
单例对象 scope="singleton"
出生:当容器创建时对象出生
多例对象 scope="prototype"
出生:当使用对象时,创建新的对象实例
实例化 Bean 的三种方式
使用默认无参构造函数,在spring的配置文件中使用bean标签,配以id和class属性之后,且没有其他属性和标签时。采用的就是默认构造函数创建bean对象,此时如果类中没有默认构造函数,则对象无法创建。
1 <bean id ="accountService" class ="com.itheima.service.impl.AccountServiceImpl" > </bean >
使用普通工厂中的方法创建对象(使用某个类中的方法创建对象,并存入spring容器)
1 2 <bean id ="instanceFactory" class ="com.itheima.factory.InstanceFactory" > </bean > <bean id ="accountService" factory-bean ="instanceFactory" factory-method ="getAccountService" > </bean >
使用工厂中的静态方法创建对象(使用某个类中的静态方法创建对象,并存入spring容器)
1 <bean id ="accountService" class ="com.itheima.factory.StaticFactory" factory-method ="getAccountService" > </bean >
1
2
3
4
5
public class StaticFactory public static IAccountService getAccountService () return new AccountServiceImpl();
依赖注入 依赖注入全称Dependency Injection ,它是spring框架核心ioc的具体实现。 通过控制反转,把对象的创建交给了spring,但是代码中不可能出现没有依赖的情况。ioc解耦只是降低他们的依赖关系,但不会消除。依赖注入相当于将当前类中依赖对象(当前类需要用到的其他类对象),交给spring去提供,我们只需在配置文件中说明依赖关系,简单来说,就是spring自动根据我们的配置来创建对象的依赖项,并注入到当前对象中。
可以注入的数据类型:
基本类型和String
其他bean类型(在配置文件中或者注解配置过的bean)
复杂类型/集合类型
注入的方式:
使用构造函数提供
使用set方法提供
使用注解提供
构造函数注入 使用标签constructor-arg,标签中的属性:
type:用于指定要注入的数据的数据类型,该数据类型也是构造函数中某个或某些参数的类型
index:用于指定要注入的数据给构造函数中指定索引位置的参数赋值。索引的位置是从0开始
name:用于指定给构造函数中指定名称的参数赋值(常用)
value:用于提供基本类型和String类型的数据
ref:用于指定其他的bean类型数据。它指的就是在spring的Ioc核心容器中出现过的bean对象
其中,前三个属性type、index、name用于指定给构造函数中哪个参数赋值,三选一即可。
优势:在获取bean对象时,注入数据是必须的操作,否则对象无法创建成功。
弊端:改变了bean对象的实例化方式,使我们在创建对象时,如果用不到这些数据,也必须提供。
1 2 3 4 5 6 7 8 <bean id ="accountService" class ="com.itheima.service.impl.AccountServiceImpl" > <constructor-arg name ="name" value ="泰斯特" > </constructor-arg > <constructor-arg name ="age" value ="18" > </constructor-arg > <constructor-arg name ="birthday" ref ="now" > </constructor-arg > </bean > <bean id ="now" class ="java.util.Date" > </bean >
1
2
3
4
5
6
7
8
9
10
11
12
public class AccountServiceImpl implements IAccountService private String name;private Integer age;private Date birthday;public AccountServiceImpl (String name,Integer age,Date birthday) this .name = name;this .age = age;this .birthday = birthday;
set方法注入 使用标签property,是更常用的方式,标签中的属性:
name:用于指定注入时所调用的set方法名称
value:用于提供基本类型和String类型的数据
ref:用于指定其他的bean类型数据。它指的就是在spring的Ioc核心容器中出现过的bean对象
相比于构造函数注入:
优势:创建对象时没有明确的限制,可以直接使用默认构造函数
弊端:如果有某个成员必须有值,则获取对象是有可能set方法没有执行
1 2 3 4 5 6 7 8 <bean id ="accountService2" class ="com.itheima.service.impl.AccountServiceImpl2" > <property name ="name" value ="TEST" > </property > <property name ="age" value ="21" > </property > <property name ="birthday" ref ="now" > </property > </bean > <bean id ="now" class ="java.util.Date" > </bean >
1
2
3
4
5
6
7
8
9
10
11
12
13
14
15
16
17
public class AccountServiceImpl2 implements IAccountService private String name;private Integer age;private Date birthday;public void setName (String name) this .name = name;public void setAge (Integer age) this .age = age;public void setBirthday (Date birthday) this .birthday = birthday;
注入集合类型 用于给List结构集合注入的标签:list array setmap props结构相同,标签可以互换
1 2 3 4 5 6 7 8 9 10 11 12 13 14 15 16 17 18 19 20 21 22 23 24 25 26 27 28 29 30 31 32 33 34 35 36 37 38 39 40 41 <bean id ="accountService3" class ="com.itheima.service.impl.AccountServiceImpl3" > <property name ="myStrs" > <set > <value > AAA</value > <value > BBB</value > <value > CCC</value > </set > </property > <property name ="myList" > <array > <value > AAA</value > <value > BBB</value > <value > CCC</value > </array > </property > <property name ="mySet" > <list > <value > AAA</value > <value > BBB</value > <value > CCC</value > </list > </property > <property name ="myMap" > <props > <prop key ="testC" > ccc</prop > <prop key ="testD" > ddd</prop > </props > </property > <property name ="myProps" > <map > <entry key ="testA" value ="aaa" > </entry > <entry key ="testB" > <value > BBB</value > </entry > </map > </property > </bean >
1
2
3
4
5
6
7
8
9
10
11
12
13
14
15
16
17
18
19
20
21
22
23
24
25
26
27
public class AccountServiceImpl3 implements IAccountService private String[] myStrs;private List<String> myList;private Set<String> mySet;private Map<String,String> myMap;private Properties myProps;public void setMyStrs (String[] myStrs) this .myStrs = myStrs;public void setMyList (List<String> myList) this .myList = myList;public void setMySet (Set<String> mySet) this .mySet = mySet;public void setMyMap (Map<String, String> myMap) this .myMap = myMap;public void setMyProps (Properties myProps) this .myProps = myProps;
注解方式注入 采用注解方式可完全省略掉xml的配置。
@Component 用于将对象创建到容器中的注解,相当于在xml声明一个bean。只需在要创建的对象类中声明一个@Component注解,其包含接收参数名为value的构造函数,如不指定value值,默认以类名的首字母小写 作为容器中的唯一id,由于构造函数的参数名是value,所以可以无需显示赋值。
1 2 3 4 5 6 7 @Component() @Component("accountServiceImpl") @Component(value = "accountServiceImpl") public class AccountServiceImpl implements IAccountService
1
2
3
4
5
6
7
8
9
public static void main (String[] args) new ClassPathXmlApplicationContext("bean.xml" );"accountServiceImpl" );
在bean.xml中声明要扫描的类在哪个包中
1
2
3
4
5
6
7
8
9
10
11
12
<?xml version="1.0" encoding="UTF-8"?> <beans xmlns ="http://www.springframework.org/schema/beans" xmlns:xsi ="http://www.w3.org/2001/XMLSchema-instance" xmlns:context ="http://www.springframework.org/schema/context" xsi:schemaLocation ="http://www.springframework.org/schema/beans http://www.springframework.org/schema/beans/spring-beans.xsd http://www.springframework.org/schema/context http://www.springframework.org/schema/context/spring-context.xsd" ><context:component-scan base-package ="com.itheima" > </context:component-scan > </beans >
以下三种注解的作用和属性和@Component是一模一样的,只是spring框架为区分三层架构而使用的注解,使三层对象更加清晰:
@Controller:一般用在表现层@Service:一般用在业务层@Repository:一般用在持久层
@Autowired 用于注入数据的注解,想当于xml配置中bean的<property>注入。
1.@Autowired
2.@Qualifiervalue属性用于指定注入bean的id。
3.@Resourcename属性用于指定bean的id。
1
2
3
4
5
6
7
8
9
10
11
12
13
14
15
16
@Service("accountService") public class AccountServiceImpl implements IAccountService @Autowired private IAccountDao accountDao = null ;@Autowired @Qualifier("accountDao1") private IAccountDao accountDao = null ;@Resource(name = "accountDao2") private IAccountDao accountDao = null ;
以上三个注入都只能注入其他bean类型的数据,而基本类型和String类型无法使用上述注解实现。另外,集合类型的注入只能通过XML来实现 。
4.@Valuevalue属性用于指定数据的值。它可以使用spring中SpEL(也就是spring的el表达式),SpEL的写法:${表达式}
5.@Scopevalue属性指定范围的取值。常用取值:singleton和prototype。
6.@PreDestroy和@PostConstructinit-method和destroy-methode的作用是一样的。
1
2
3
4
5
6
7
8
9
10
11
12
13
14
15
16
17
@Service("accountService") @Scope("prototype") public class AccountServiceImpl implements IAccountService @Resource(name = "accountDao2") private IAccountDao accountDao = null ;@PostConstruct public void init () "初始化方法执行了" );@PreDestroy public void destroy () "销毁方法执行了" );
@Configuration 用于指定当前类是一个 spring 配置类。当配置类作为AnnotationConfigApplicationContext对象创建的参数时,该注解可以不写。
1
2
3
4
5
6
@Configuration @ComponentScan("com.itheima") @PropertySource("classpath:jdbcConfig.properties") public class SpringConfiguration
1
2
3
4
public static void main (String[] args) new AnnotationConfigApplicationContext(SpringConfiguration.class);
1.@ComponentScanvalue属性和basePackages的作用是一样的,都是用于指定创建容器时要扫描的包。等同于在xml中配置了<context:component-scan base-package="com.itheima"></context:component-scan>
2.@PropertySourcevalue属性指定文件的名称和路径, classpath关键字表示类路径下。
3.@Beanname属性用于指定bean的id。当不写时,默认值是当前方法的名称。如果创建方法有参数,spring框架会去容器中查找有没有可用的bean对象,查找的方式和Autowired注解的作用是一样的。
完整的JdbcConfig代码
1
2
3
4
5
6
7
8
9
10
11
12
13
14
15
16
17
18
19
20
21
22
23
24
25
26
27
28
29
30
31
32
33
34
35
36
37
38
39
40
41
42
43
44
45
46
47
48
49
50
51
52
53
54
55
56
57
58
@Configuration public class JdbcConfig @Value("${jdbc.driver}") private String driver;@Value("${jdbc.url}") private String url;@Value("${jdbc.username}") private String username;@Value("${jdbc.password}") private String password;@Bean(name="runner") @Scope("prototype") public QueryRunner createQueryRunner (@Qualifier("ds2") DataSource dataSource) return new QueryRunner(dataSource);@Bean(name="ds2") public DataSource createDataSource () try {new ComboPooledDataSource();return ds;catch (Exception e){throw new RuntimeException(e);@Bean(name="ds1") public DataSource createDataSource1 () try {new ComboPooledDataSource();"jdbc:mysql://localhost:3306/eesy02" );return ds;catch (Exception e){throw new RuntimeException(e);
4.@Importvalue属性用于指定其他配置类的字节码。当使用Import的注解之后,有Import注解的类就父配置类,而导入的都是子配置类。SpringConfiguration中引入JdbcConfig
通过注解@Import
1
2
3
4
5
6
@Configuration @ComponentScan("com.itheima") @Import(JdbcConfig.class) @PropertySource("classpath:jdbcConfig.properties") public class SpringConfiguration
增加扫描包,前提是JdbcConfig必须包含@Configuration注解
1
2
3
4
5
@Configuration @ComponentScan("com.itheima","config") @PropertySource("classpath:jdbcConfig.properties") public class SpringConfiguration
AnnotationConfigApplicationContext显示指定
1 ApplicationContext ac = new AnnotationConfigApplicationContext(SpringConfiguration.class,JdbcConfig.class);
整合junit单元测试 1.导入spring整合junit的jar(坐标)
1 2 3 4 5 6 7 8 9 10 11 12 13 14 <dependencies > <dependency > <groupId > org.springframework</groupId > <artifactId > spring-test</artifactId > <version > 5.0.2.RELEASE</version > </dependency > <dependency > <groupId > junit</groupId > <artifactId > junit</artifactId > <version > 4.12</version > </dependency > </dependencies >
当使用spring 5.x版本的时候,要求junit的jar必须是4.12及以上
2.使用junit提供的一个注解把原有的main方法替换了,替换成spring提供的@Runwith
3.告知spring的运行器,spring和ioc创建是基于xml还是注解的,并且说明位置,通过@ContextConfiguration
locations:指定xml文件的位置,加上classpath关键字,表示在类路径下
classes:指定注解类所在地位置
1
2
3
4
5
6
7
8
9
10
11
12
13
14
15
16
17
18
@RunWith(SpringJUnit4ClassRunner.class) @ContextConfiguration(classes = SpringConfiguration.class) public class AccountServiceTest @Autowired private IAccountService as = null ;@Test public void testFindAll () for (Account account : accounts){
AOP AOP全称Aspect Oriented Programming ,即面向切面编程。简单来说就是把程序中的重复代码抽取出来,在需要执行的时候,使用动态代理 的技术,在不修改源码的基础上,对已有方法进行增强。
实现原理 AOP的实现是基于动态代理技术,在Spring中常用的有2种方式实现动态代理:
基于接口的动态代理: JDK官方的Proxy类,要求被代理类最少实现一个接口。
基于子类的动态代理: 第三方的CGLib,如果报 asmxxxx 异常,需要导入 asm.jar。要求被代理类不能用 final 修饰的类(最终类)
下面以银行账号转账为例,通过JDK官方的动态代理技术,在转账的操作中增加事务,实现数据的一致性。
service层接口:
1 2 3 4 5 6 7 8 9 10 11 12 public interface IAccountService void transfer (String sourceName,String targetName,Float money)
service层实现:
1
2
3
4
5
6
7
8
9
10
11
12
13
14
15
16
17
18
19
20
21
22
23
24
public class AccountServiceImpl implements IAccountService private IAccountDao accountDao;@Override public void transfer (String sourceName, String targetName, Float money) "transfer...." );
dao层接口:
1
2
3
4
5
6
7
8
9
10
11
12
13
14
15
16
17
18
19
20
21
22
23
24
25
26
27
28
29
30
31
32
33
34
35
36
37
38
39
40
public interface IAccountDao List<Account> findAllAccount () ;Account findAccountById (Integer accountId) ;void saveAccount (Account account) void updateAccount (Account account) void deleteAccount (Integer acccountId) Account findAccountByName (String accountName) ;
dao层实现:
1
2
3
4
5
6
7
8
9
10
11
12
13
14
15
16
17
18
19
20
21
22
23
24
25
26
27
28
29
30
31
32
33
34
35
36
37
38
39
40
41
42
43
44
45
46
47
48
49
public class AccountDaoImpl implements IAccountDao private QueryRunner runner;private ConnectionUtils connectionUtils;public void setRunner (QueryRunner runner) this .runner = runner;public void setConnectionUtils (ConnectionUtils connectionUtils) this .connectionUtils = connectionUtils;@Override public void saveAccount (Account account) try {"insert into account(name,money)values(?,?)" ,account.getName(),account.getMoney());catch (Exception e) {throw new RuntimeException(e);@Override public void updateAccount (Account account) try {"update account set name=?,money=? where id=?" ,account.getName(),account.getMoney(),account.getId());catch (Exception e) {throw new RuntimeException(e);@Override public Account findAccountByName (String accountName) try {"select * from account where name = ? " ,new BeanListHandler<Account>(Account.class),accountName);if (accounts == null || accounts.size() == 0 ){return null ;if (accounts.size() > 1 ){throw new RuntimeException("结果集不唯一,数据有问题" );return accounts.get(0 );catch (Exception e) {throw new RuntimeException(e);
工具类ConnectionUtils,用于让多线程获取同一个连接对象:
1 2 3 4 5 6 7 8 9 10 11 12 13 14 15 16 17 18 19 20 21 22 23 24 25 26 27 28 29 30 31 32 33 34 35 36 37 38 39 40 41 public class ConnectionUtils private ThreadLocal<Connection> tl = new ThreadLocal<Connection>();private DataSource dataSource;public void setDataSource (DataSource dataSource) this .dataSource = dataSource;public Connection getThreadConnection () try {if (conn == null ) {return conn;catch (Exception e){throw new RuntimeException(e);public void removeConnection ()
工具类TransactionManager,用于操作连接对象实现事务:
1 2 3 4 5 6 7 8 9 10 11 12 13 14 15 16 17 18 19 20 21 22 23 24 25 26 27 28 29 30 31 32 33 34 35 36 37 38 39 40 41 42 43 44 45 46 47 48 49 50 51 52 53 54 55 56 57 public class TransactionManager private ConnectionUtils connectionUtils;public void setConnectionUtils (ConnectionUtils connectionUtils) this .connectionUtils = connectionUtils;public void beginTransaction () try {false );catch (Exception e){public void commit () try {catch (Exception e){public void rollback () try {catch (Exception e){public void release () try {catch (Exception e){
service工厂类,创建service的代理对象,通过jdk自带的Proxy类:
1 2 3 4 5 6 7 8 9 10 11 12 13 14 15 16 17 18 19 20 21 22 23 24 25 26 27 28 29 30 31 32 33 34 35 36 37 38 39 40 41 42 43 44 45 46 47 48 49 50 51 52 53 54 55 56 57 58 59 60 61 62 63 64 65 public class BeanFactory private IAccountService accountService;private TransactionManager txManager;public void setTxManager (TransactionManager txManager) this .txManager = txManager;public final void setAccountService (IAccountService accountService) this .accountService = accountService;public IAccountService getAccountService () return (IAccountService)Proxy.newProxyInstance(accountService.getClass().getClassLoader(),new InvocationHandler() {@Override public Object invoke (Object proxy, Method method, Object[] args) throws Throwable if ("test" .equals(method.getName())){ return method.invoke(accountService,args);null ;try {return rtValue;catch (Exception e) {throw new RuntimeException(e);finally {
通过配置bean.xml实现依赖注入
1
2
3
4
5
6
7
8
9
10
11
12
13
14
15
16
17
18
19
20
21
22
23
24
25
26
27
28
29
30
31
32
33
34
35
36
37
38
39
40
41
42
43
44
45
46
47
48
49
50
51
52
53
54
55
<?xml version="1.0" encoding="UTF-8"?> <beans xmlns ="http://www.springframework.org/schema/beans" xmlns:xsi ="http://www.w3.org/2001/XMLSchema-instance" xsi:schemaLocation ="http://www.springframework.org/schema/beans http://www.springframework.org/schema/beans/spring-beans.xsd" ><bean id ="proxyAccountService" factory-bean ="beanFactory" factory-method ="getAccountService" > </bean > <bean id ="beanFactory" class ="com.itheima.factory.BeanFactory" > <property name ="accountService" ref ="accountService" > </property > <property name ="txManager" ref ="txManager" > </property > </bean > <bean id ="accountService" class ="com.itheima.service.impl.AccountServiceImpl" > <property name ="accountDao" ref ="accountDao" > </property > </bean > <bean id ="accountDao" class ="com.itheima.dao.impl.AccountDaoImpl" > <property name ="runner" ref ="runner" > </property > <property name ="connectionUtils" ref ="connectionUtils" > </property > </bean > <bean id ="runner" class ="org.apache.commons.dbutils.QueryRunner" scope ="prototype" > </bean > <bean id ="dataSource" class ="com.mchange.v2.c3p0.ComboPooledDataSource" > <property name ="driverClass" value ="com.mysql.jdbc.Driver" > </property > <property name ="jdbcUrl" value ="jdbc:mysql://localhost:3306/eesy" > </property > <property name ="user" value ="root" > </property > <property name ="password" value ="1234" > </property > </bean > <bean id ="connectionUtils" class ="com.itheima.utils.ConnectionUtils" > <property name ="dataSource" ref ="dataSource" > </property > </bean > <bean id ="txManager" class ="com.itheima.utils.TransactionManager" > <property name ="connectionUtils" ref ="connectionUtils" > </property > </bean > </beans >
测试类:
1 2 3 4 5 6 7 8 9 10 11 12 13 14 15 16 17 @RunWith(SpringJUnit4ClassRunner.class) @ContextConfiguration(locations = "classpath:bean.xml") public class AccountServiceTest @Autowired @Qualifier("proxyAccountService") private IAccountService as;@Test public void testTransfer () "aaa" ,"bbb" ,100f );
动态代理 特点:字节码随用随创建,随用随加载
基于接口的动态代理 创建一个接口:
1 2 3 4 5 6 7 8 9 10 11 12 13 14 15 16 17 public interface IProducer public void saleProduct (float money) public void afterService (float money)
接口的实现类:
1 2 3 4 5 6 7 8 9 10 11 12 13 14 15 16 17 18 19 20 21 public class Producer implements IProducer public void saleProduct (float money) "销售产品,并拿到钱:" +money);public void afterService (float money) "提供售后服务,并拿到钱:" +money);
通过代理类调用接口实现:
1
2
3
4
5
6
7
8
9
10
11
12
13
14
15
16
17
18
19
20
21
22
23
24
25
26
27
28
29
30
31
32
33
34
35
36
37
38
39
40
41
42
43
44
45
46
47
48
49
public static void main (String[] args) final Producer producer = new Producer();new InvocationHandler() {@Override public Object invoke (Object proxy, Method method, Object[] args) throws Throwable null ;0 ];if ("saleProduct" .equals(method.getName())) {0.8f );return returnValue;10000f );
基于子类的动态代理 创建一个实现类:
1 2 3 4 5 6 7 8 9 10 11 12 13 14 15 16 17 18 19 20 21 public class Producer public void saleProduct (float money) "销售产品,并拿到钱:" +money);public void afterService (float money) "提供售后服务,并拿到钱:" +money);
基于实现类的子类实现代理:
1
2
3
4
5
6
7
8
9
10
11
12
13
14
15
16
17
18
19
20
21
22
23
24
25
26
27
28
29
30
31
32
33
34
35
36
37
38
39
40
41
42
43
44
45
46
47
48
public static void main (String[] args) final Producer producer = new Producer();new MethodInterceptor() {@Override public Object intercept (Object proxy, Method method, Object[] args, MethodProxy methodProxy) throws Throwable null ;0 ];if ("saleProduct" .equals(method.getName())) {0.8f );return returnValue;12000f );
Spring的AOP实现 AOP的相关术语
Joinpoint(连接点): Pointcut(切入点): Advice(通知/增强): Introduction(引介): Target(目标对象): Weaving(织入): Proxy(代理): Aspect(切面):
基于xml的AOP配置 我们通过AOP动态为service类增加日志打印功能。
导入依赖项:
1 2 3 4 5 6 7 8 9 10 11 12 13 <dependencies > <dependency > <groupId > org.springframework</groupId > <artifactId > spring-context</artifactId > <version > 5.0.2.RELEASE</version > </dependency > <dependency > <groupId > org.aspectj</groupId > <artifactId > aspectjweaver</artifactId > <version > 1.8.7</version > </dependency > </dependencies >
创建service作为被代理类:
1 2 3 4 5 6 7 8 9 10 11 12 13 14 15 16 17 18 19 20 21 22 23 24 25 26 27 28 29 30 31 32 33 34 35 36 37 38 39 40 41 42 43 44 45 public interface IAccountService void saveAccount () void updateAccount (int i) int deleteAccount () public class AccountServiceImpl implements IAccountService @Override public void saveAccount () "执行了保存" );@Override public void updateAccount (int i) "执行了更新" +i);@Override public int deleteAccount () "执行了删除" );return 0 ;
创建Logger类作为AOP的通知类
1 2 3 4 5 6 7 8 9 10 11 12 public class Logger public void printLog () "Logger类中的pringLog方法开始记录日志了。。。" );
配置ioc的依赖注入
1
2
3
4
5
6
7
8
9
10
11
12
13
14
15
16
17
18
19
20
21
22
23
24
25
<?xml version="1.0" encoding="UTF-8"?> <beans xmlns ="http://www.springframework.org/schema/beans" xmlns:xsi ="http://www.w3.org/2001/XMLSchema-instance" xmlns:aop ="http://www.springframework.org/schema/aop" xsi:schemaLocation ="http://www.springframework.org/schema/beans http://www.springframework.org/schema/beans/spring-beans.xsd http://www.springframework.org/schema/aop http://www.springframework.org/schema/aop/spring-aop.xsd" ><bean id ="accountService" class ="com.itheima.service.impl.AccountServiceImpl" > </bean > <bean id ="logger" class ="com.itheima.utils.Logger" > </bean > <aop:config > <aop:aspect id ="logAdvice" ref ="logger" > <aop:before method ="printLog" pointcut ="execution(* com.itheima.service.impl.*.*(..))" > </aop:before > </aop:aspect > </aop:config > </beans >
测试类:
1
2
3
4
5
6
7
8
9
10
public static void main (String[] args) new ClassPathXmlApplicationContext("bean.xml" );"accountService" );1 );
总结:
在xml中配置通知Bean,本例中为Logger类
使用aop:config标签表明开始AOP的配置
使用aop:aspect标签表明配置切面,id属性表示切面的唯一标识,ref属性指定通知类bean的Id。
配置通知类型,aop:before表示配置前置通知,method属性用于指定Logger类中哪个方法是前置通知,pointcut属性用于指定切入点表达式,该表达式的含义指的是对业务层中哪些方法增强。
切入点表达式写法
表达式
访问修饰符 返回值 包名.包名.包名...类名.方法名(参数列表)
标准的表达式写法
public void com.itheima.service.impl.AccountServiceImpl.saveAccount()
访问修饰符可以省略
void com.itheima.service.impl.AccountServiceImpl.saveAccount()
返回值可以使用通配符,表示任意返回值
* com.itheima.service.impl.AccountServiceImpl.saveAccount()
包名可以使用通配符,表示任意包。但是有几级包,就需要写几个*.
* *.*.*.*.AccountServiceImpl.saveAccount())
包名可以使用..表示当前包及其子包
* *..AccountServiceImpl.saveAccount()
类名和方法名都可以使用*来实现通配
* *..*.*()
参数列表
可以直接写数据类型:intjava.lang.String*表示任意类型,但是必须有参数..表示有无参数均可,有参数可以是任意类型
全通配写法
* *..*.*(..)
业务层实现类下的所有方法(开发中常用)
* com.company.service.impl.*.*(..)
通知类型 1 2 3 4 5 6 7 8 9 10 11 12 13 14 15 16 17 18 19 20 21 22 23 24 25 <aop:config > <aop:pointcut id ="pt1" expression ="execution(* com.itheima.service.impl.*.*(..))" > </aop:pointcut > <aop:aspect id ="logAdvice" ref ="logger" > <aop:around method ="aroundPringLog" pointcut-ref ="pt1" > </aop:around > </aop:aspect > </aop:config >
1 2 3 4 5 6 7 8 9 10 11 12 13 14 15 16 17 18 19 20 21 22 23 24 25 26 27 28 29 30 31 32 33 34 35 36 37 38 39 40 41 42 43 44 45 46 47 48 49 50 51 52 53 54 55 56 57 58 59 60 61 62 public class Logger public void beforePrintLog () "前置通知Logger类中的beforePrintLog方法开始记录日志了。。。" );public void afterReturningPrintLog () "后置通知Logger类中的afterReturningPrintLog方法开始记录日志了。。。" );public void afterThrowingPrintLog () "异常通知Logger类中的afterThrowingPrintLog方法开始记录日志了。。。" );public void afterPrintLog () "最终通知Logger类中的afterPrintLog方法开始记录日志了。。。" );public Object aroundPringLog (ProceedingJoinPoint pjp) null ;try {"Logger类中的aroundPringLog方法开始记录日志了。。。前置" );"Logger类中的aroundPringLog方法开始记录日志了。。。后置" );return rtValue;catch (Throwable t){"Logger类中的aroundPringLog方法开始记录日志了。。。异常" );throw new RuntimeException(t);finally {"Logger类中的aroundPringLog方法开始记录日志了。。。最终" );
基于注解的AOP配置 修改service实现类,增加service注解:
1 2 3 4 @Service("accountService") public class AccountServiceImpl implements IAccountService
修改Logger类,增加aop注解:
1 2 3 4 5 6 7 8 9 10 11 12 13 14 15 16 17 18 19 20 21 22 23 24 25 26 27 28 29 30 31 32 33 34 35 36 37 38 39 40 41 42 43 44 45 46 47 48 49 50 51 52 53 54 55 56 57 58 59 60 @Component("logger") @Aspect public class Logger @Pointcut("execution(* com.itheima.service.impl.*.*(..))") private void pt1 () public void beforePrintLog () "前置通知Logger类中的beforePrintLog方法开始记录日志了。。。" );public void afterReturningPrintLog () "后置通知Logger类中的afterReturningPrintLog方法开始记录日志了。。。" );public void afterThrowingPrintLog () "异常通知Logger类中的afterThrowingPrintLog方法开始记录日志了。。。" );public void afterPrintLog () "最终通知Logger类中的afterPrintLog方法开始记录日志了。。。" );@Around("pt1()") public Object aroundPringLog (ProceedingJoinPoint pjp) null ;try {"Logger类中的aroundPringLog方法开始记录日志了。。。前置" );"Logger类中的aroundPringLog方法开始记录日志了。。。后置" );return rtValue;catch (Throwable t){"Logger类中的aroundPringLog方法开始记录日志了。。。异常" );throw new RuntimeException(t);finally {"Logger类中的aroundPringLog方法开始记录日志了。。。最终" );
这样一来xml中只剩下这2个配置:
1 2 3 4 5 6 7 8 9 10 11 12 13 14 15 16 17 18 <?xml version="1.0" encoding="UTF-8"?> <beans xmlns ="http://www.springframework.org/schema/beans" xmlns:xsi ="http://www.w3.org/2001/XMLSchema-instance" xmlns:aop ="http://www.springframework.org/schema/aop" xmlns:context ="http://www.springframework.org/schema/context" xsi:schemaLocation ="http://www.springframework.org/schema/beans http://www.springframework.org/schema/beans/spring-beans.xsd http://www.springframework.org/schema/aop http://www.springframework.org/schema/aop/spring-aop.xsd http://www.springframework.org/schema/context http://www.springframework.org/schema/context/spring-context.xsd" ><context:component-scan base-package ="com.itheima" > </context:component-scan > <aop:aspectj-autoproxy > </aop:aspectj-autoproxy > </beans >
可完全使用注解,舍弃任何xml配置。
1 2 3 4 5 @Configuration @ComponentScan("com.itheima") @EnableAspectJAutoProxy public class SpringConfiguarion
修改测试类:
1 2 3 4 5 6 7 8 9 public static void main (String[] args) new AnnotationConfigApplicationContext(SpringConfiguarion.class);"accountService" );
IOC和AOP结合案例 Spring内置事务 PlatformTransactionManager是Spring内置的事务管理接口,它主要提供以下方法:
方法
描述
TransactionStatus getTransaction(TransactionDefinition definition)
获取事务状态信息
void commit(TransactionStatus status)
提交事务
void rollback(TransactionStatus status)
回滚事务
PlatformTransactionManager有2个实现类:
org.springframework.jdbc.datasource.DataSourceTransactionManager
使用Spring JDBC 或 iBatis 进行持久化数据时使用
org.springframework.orm.hibernate5.HibernateTransactionManager
使用 Hibernate 版本进行持久化数据时使用
TransactionDefinition TransactionDefinition是事务定义的信息对象,它用来控制事务的行为,它的主要方法有:
方法
描述
String getName()
获取事务对象名称
int getIsolationLevel()
获取事务隔离级别
int getPropagationBehavior()
获取事务传播行为
int getTimeout()
获取事务超时时间
boolean isReadOnly()
获取事务是否只读
事务的隔离级别 事务隔离级别反映事务提交并发访问时的处理态度
枚举
描述
ISOLATION_DEFAULT
默认级别,归属下列某一种
ISOLATION_READ_UNCOMMITTED
可以读取未提交数据
ISOLATION_READ_COMMITTED
只能读取已提交数据,解决脏读问题(Oracle默认级别)
ISOLATION_REPEATABLE_READ
是否读取其他事务提交修改后的数据,解决不可重复读问题(MySQL默认级别)
ISOLATION_SERIALIZABLE
是否读取其他事务提交添加后的数据,解决幻读问题
事务的传播行为
枚举
描述
REQUIRED
如果当前没有事务,就新建一个事务,如果已经存在一个事务中,加入到这个事务中(默认值,常用)
SUPPORTS
支持当前事务,如果当前没有事务,就以非事务(没有事务)方式执行(常用)
MANDATORY
使用当前的事务,如果当前没有事务,就抛出异常
REQUERS_NEW
新建事务,如果当前在事务中,把当前事务挂起
NOT_SUPPORTED
以非事务方式执行操作,如果当前存在事务,就把当前事务挂起
NEVER
以非事务方式运行,如果当前存在事务,抛出异常
NESTED
如果当前存在事务,则在嵌套事务内执行。如果当前没有事务,则执行 REQUIRED 类似的操作。
超时时间 默认值是-1,没有超时限制。如果有,以秒为单位进行设置。
是否是只读事务 建议查询时设置为只读,增删改时设置为非只读,即读写事务。
TransactionStatus TransactionStatus接口描述了某个时间点上事务对象的状态信息,包含由6个具体的操作
方法
描述
void flush()
刷新事务
boolean hasSavepoint()
获取事务是否存在存储点
boolean isCompleted()
获取事务是否完成
boolean isNewTransaction()
获取事务是否为新的事务
boolean isRollbackOnly()
获取事务是否回滚
void setRollbackOnly()
设置事务回滚
Spring基于xml的事务控制 service层的接口与实现,事务控制应该都是在service层(业务层)
1 2 3 4 5 6 7 8 9 10 11 12 13 14 15 16 17 18 19 20 21 22 23 24 25 26 27 28 29 30 31 32 33 34 35 36 37 38 39 40 41 42 43 44 45 46 47 48 49 50 51 public interface IAccountService Account findAccountById (Integer accountId) ;void transfer (String sourceName,String targetName,Float money) public class AccountServiceImpl implements IAccountService private IAccountDao accountDao;public void setAccountDao (IAccountDao accountDao) this .accountDao = accountDao;@Override public Account findAccountById (Integer accountId) return accountDao.findAccountById(accountId);@Override public void transfer (String sourceName, String targetName, Float money) "transfer...." );int i=1 /0 ;
dao层(持久层)的接口与实现
1 2 3 4 5 6 7 8 9 10 11 12 13 14 15 16 17 18 19 20 21 22 23 24 25 26 27 28 29 30 31 32 33 34 35 36 37 38 39 40 41 42 43 44 45 46 47 48 public interface IAccountDao Account findAccountById (Integer accountId) ;Account findAccountByName (String accountName) ;void updateAccount (Account account) public class AccountDaoImpl extends JdbcDaoSupport implements IAccountDao @Override public Account findAccountById (Integer accountId) super .getJdbcTemplate().query("select * from account where id = ?" ,new BeanPropertyRowMapper<Account>(Account.class),accountId);return accounts.isEmpty()?null :accounts.get(0 );@Override public Account findAccountByName (String accountName) super .getJdbcTemplate().query("select * from account where name = ?" ,new BeanPropertyRowMapper<Account>(Account.class),accountName);if (accounts.isEmpty()){return null ;if (accounts.size()>1 ){throw new RuntimeException("结果集不唯一" );return accounts.get(0 );@Override public void updateAccount (Account account) super .getJdbcTemplate().update("update account set name=?,money=? where id=?" ,account.getName(),account.getMoney(),account.getId());
dao的实现类继承了org.springframework.jdbc.core.support.JdbcDaoSupport,该类的构造函数可接收一个dataSource对象,返回JdbcTemplate对象供执行sql语句,这样我们可以通过注入dataSource得到AccountDao的实现类。
domain层(模型层)
1 2 3 4 5 6 7 8 9 10 11 12 13 14 15 16 17 18 19 20 21 22 23 24 25 26 27 28 29 30 31 32 33 34 35 36 37 38 39 public class Account implements Serializable private Integer id;private String name;private Float money;public Integer getId () return id;public void setId (Integer id) this .id = id;public String getName () return name;public void setName (String name) this .name = name;public Float getMoney () return money;public void setMoney (Float money) this .money = money;@Override public String toString () return "Account{" +"id=" + id +", name='" + name + '\'' +", money=" + money +'}' ;
测试类:
1 2 3 4 5 6 7 8 9 10 11 12 13 @RunWith(SpringJUnit4ClassRunner.class) @ContextConfiguration(locations = "classpath:bean.xml") public class AccountServiceTest @Autowired private IAccountService as;@Test public void testTransfer () "aaa" ,"bbb" ,100f );
到此为此,我们通过ioc实现了业务功能,但是还没有引入事务控制,接下来通过aop来声明事务控制,我们只需在bean.xml中配置即可,完整的bean.xml如下:
1 2 3 4 5 6 7 8 9 10 11 12 13 14 15 16 17 18 19 20 21 22 23 24 25 26 27 28 29 30 31 32 33 34 35 36 37 38 39 40 41 42 43 44 45 46 47 48 49 50 51 52 53 54 55 56 57 58 59 60 61 <?xml version="1.0" encoding="UTF-8"?> <beans xmlns ="http://www.springframework.org/schema/beans" xmlns:xsi ="http://www.w3.org/2001/XMLSchema-instance" xmlns:aop ="http://www.springframework.org/schema/aop" xmlns:tx ="http://www.springframework.org/schema/tx" xsi:schemaLocation =" http://www.springframework.org/schema/beans http://www.springframework.org/schema/beans/spring-beans.xsd http://www.springframework.org/schema/tx http://www.springframework.org/schema/tx/spring-tx.xsd http://www.springframework.org/schema/aop http://www.springframework.org/schema/aop/spring-aop.xsd" ><bean id ="accountService" class ="com.itheima.service.impl.AccountServiceImpl" > <property name ="accountDao" ref ="accountDao" > </property > </bean > <bean id ="accountDao" class ="com.itheima.dao.impl.AccountDaoImpl" > <property name ="dataSource" ref ="dataSource" > </property > </bean > <bean id ="dataSource" class ="org.springframework.jdbc.datasource.DriverManagerDataSource" > <property name ="driverClassName" value ="com.mysql.jdbc.Driver" > </property > <property name ="url" value ="jdbc:mysql://localhost:3306/eesy" > </property > <property name ="username" value ="root" > </property > <property name ="password" value ="1234" > </property > </bean > <bean id ="transactionManager" class ="org.springframework.jdbc.datasource.DataSourceTransactionManager" > <property name ="dataSource" ref ="dataSource" > </property > </bean > <tx:advice id ="txAdvice" transaction-manager ="transactionManager" > <tx:attributes > <tx:method name ="*" propagation ="REQUIRED" read-only ="false" /> <tx:method name ="find*" propagation ="SUPPORTS" read-only ="true" > </tx:method > </tx:attributes > </tx:advice > <aop:config > <aop:pointcut id ="pt1" expression ="execution(* com.itheima.service.impl.*.*(..))" > </aop:pointcut > <aop:advisor advice-ref ="txAdvice" pointcut-ref ="pt1" > </aop:advisor > </aop:config > </beans >
spring中基于XML的声明式事务控制配置步骤:
配置事务管理器
配置事务的通知
注意:需要导入事务的约束,tx和aop的命名空间,使用tx:advice标签配置事务通知
配置AOP中的通用切入点表达式
建立事务通知和切入点表达式的对应关系
配置事务的属性
Spring基于注解的事务控制 修改service层实现类,IAccountDao声明为注入,将方法transfer声明为切入点,实现事务通知
1 2 3 4 5 6 7 8 9 10 11 12 13 14 15 16 17 18 19 20 21 22 23 24 25 26 27 28 29 30 31 32 33 34 35 @Service("accountService") @Transactional(propagation= Propagation.SUPPORTS,readOnly=true) public class AccountServiceImpl implements IAccountService @Autowired private IAccountDao accountDao;@Override public Account findAccountById (Integer accountId) return accountDao.findAccountById(accountId);@Transactional(propagation= Propagation.REQUIRED,readOnly=false) @Override public void transfer (String sourceName, String targetName, Float money) "transfer...." );int i=1 /0 ;
修改dao层实现类,声明Bean,表示可注入对象。org.springframework.jdbc.core.support.JdbcDaoSupport了,要自己声明需注入JdbcTemplate对象,因为我们无法修改jdbc的源码,无法通过注解方式得到jdbcTemplate对象。
1 2 3 4 5 6 7 8 9 10 11 12 13 14 15 16 17 18 19 20 21 22 23 24 25 26 27 28 29 @Repository("accountDao") public class AccountDaoImpl implements IAccountDao @Autowired private JdbcTemplate jdbcTemplate;@Override public Account findAccountById (Integer accountId) "select * from account where id = ?" ,new BeanPropertyRowMapper<Account>(Account.class),accountId);return accounts.isEmpty()?null :accounts.get(0 );@Override public Account findAccountByName (String accountName) "select * from account where name = ?" ,new BeanPropertyRowMapper<Account>(Account.class),accountName);if (accounts.isEmpty()){return null ;if (accounts.size()>1 ){throw new RuntimeException("结果集不唯一" );return accounts.get(0 );@Override public void updateAccount (Account account) "update account set name=?,money=? where id=?" ,account.getName(),account.getMoney(),account.getId());
到这里我们还需要在bean.xml中声明JdbcTemplate,事务管理器以及开启对注解事务的支持,要注意这里和纯xml的配置相比,引用了context的命名空间
1 2 3 4 5 6 7 8 9 10 11 12 13 14 15 16 17 18 19 20 21 22 23 24 25 26 27 28 29 30 31 32 33 34 35 36 37 38 39 40 <?xml version="1.0" encoding="UTF-8"?> <beans xmlns ="http://www.springframework.org/schema/beans" xmlns:xsi ="http://www.w3.org/2001/XMLSchema-instance" xmlns:aop ="http://www.springframework.org/schema/aop" xmlns:tx ="http://www.springframework.org/schema/tx" xmlns:context ="http://www.springframework.org/schema/context" xsi:schemaLocation =" http://www.springframework.org/schema/beans http://www.springframework.org/schema/beans/spring-beans.xsd http://www.springframework.org/schema/tx http://www.springframework.org/schema/tx/spring-tx.xsd http://www.springframework.org/schema/aop http://www.springframework.org/schema/aop/spring-aop.xsd http://www.springframework.org/schema/context http://www.springframework.org/schema/context/spring-context.xsd" ><context:component-scan base-package ="com.itheima" > </context:component-scan > <bean id ="jdbcTemplate" class ="org.springframework.jdbc.core.JdbcTemplate" > <property name ="dataSource" ref ="dataSource" > </property > </bean > <bean id ="dataSource" class ="org.springframework.jdbc.datasource.DriverManagerDataSource" > <property name ="driverClassName" value ="com.mysql.jdbc.Driver" > </property > <property name ="url" value ="jdbc:mysql://localhost:3306/eesy" > </property > <property name ="username" value ="root" > </property > <property name ="password" value ="1234" > </property > </bean > <bean id ="transactionManager" class ="org.springframework.jdbc.datasource.DataSourceTransactionManager" > <property name ="dataSource" ref ="dataSource" > </property > </bean > <tx:annotation-driven transaction-manager ="transactionManager" > </tx:annotation-driven > </beans >
spring中基于XML的声明式事务控制配置步骤:
配置事务管理器
开启spring对注解事务的支持
在需要事务支持的地方使用@Transactional注解
我们还可以继续使用注解,使bean.xml中的配置完全由注解实现,可直接删除bean.xml。
在config包中新建3个配置类,这3个配置类就包括了xml中的所有配置内容
1 2 3 4 5 6 7 8 9 10 11 12 13 14 15 16 17 18 19 20 21 22 23 24 25 26 27 28 29 30 31 32 33 34 35 36 37 38 39 40 41 42 43 44 45 46 47 48 49 50 51 52 53 54 55 56 57 58 59 60 61 62 63 64 65 66 67 68 69 public class JdbcConfig @Value("${jdbc.driver}") private String driver;@Value("${jdbc.url}") private String url;@Value("${jdbc.username}") private String username;@Value("${jdbc.password}") private String password;@Bean(name="jdbcTemplate") public JdbcTemplate createJdbcTemplate (DataSource dataSource) return new JdbcTemplate(dataSource);@Bean(name="dataSource") public DataSource createDataSource () new DriverManagerDataSource();return ds;public class TransactionConfig @Bean(name="transactionManager") public PlatformTransactionManager createTransactionManager (DataSource dataSource) return new DataSourceTransactionManager(dataSource);@Configuration @ComponentScan("com.itheima") @Import({JdbcConfig.class,TransactionConfig.class}) @PropertySource("jdbcConfig.properties") @EnableTransactionManagement public class SpringConfiguration
接下来在resource中创建jdbcConfig.properties文件,将数据库的连接信息配置在里面
1 2 3 4 jdbc.driver =com.mysql.jdbc.Driver jdbc.url =jdbc:mysql://localhost:3306/eesy jdbc.username =root jdbc.password =1234
最后是测试类,引入配置类SpringConfiguration.class
1 2 3 4 5 6 7 8 9 10 11 12 13 @RunWith(SpringJUnit4ClassRunner.class) @ContextConfiguration(classes= SpringConfiguration.class) public class AccountServiceTest @Autowired private IAccountService as;@Test public void testTransfer () "aaa" ,"bbb" ,100f );
参考资料:
传智播客SSM框架之Spring